


When I think of pencil cases, a zippered pouch usually springs to mind, or maybe a pencil roll. In reality, any container the right shape can be used to store and carry pencils. Today I'm going to show you how to easily make a simple, lined drawstring pencil pouch.

The plastic / vinyl / neoprene zippered pouches, so common now, are a relatively recent invention. As young kids, we had wooden boxes to hold our pencils. They never wore out, so no need to buy a new one for school each year.

With a finished size of roughly 10" x 4", the pencil pouch will comfortably hold a set of 12 pencils.
Materials:
- 2 pieces - 9½" x 5" (24cm x 13cm) - main fabric
- 2 pieces - 9½" x 5" (24cm x 13cm) - lining fabric
- 2 pieces - 2" x 5½" (5cm x 14cm) - contrast fabric for drawstring casing
- 2 lengths of cord, tape or ribbon - 13" - drawstring
Instructions:
All seams are ⅜"(1cm), unless otherwise indicated. I didn't need to use any pins when making this bag. If you find you need to pin the seams...- pin
- baste (hand sew with a long stitch)
- remove pins
- stitch seam with machine
- remove basting
Drawstring Casing:

- Fold short ends over ¼" and finger press.
- Fold ¼" again and stitch
- Fold in half lengthwise with wrong sides together.
- Finger press
Attach Casing to Exterior Fabric:

- Centre raw edge of casing on right side of exterior fabric.
- Stitch with ⅛" seam.
- Repeat for 2nd side.
Sew Exterior Fabric:

- With right sides together, sew side and bottom seams. Be careful NOT to catch the casing in the seam. If necessary, use a ¼" seam allowance. Mine was fine with a seam allowance of ⅜".
- Neaten edges.
Sew Lining:

- With right sides together sew side and bottom seams.
- Leave a 2" - 3" gap in the bottom seam.
Attach Lining to Exterior:

- Turn exterior fabric right side out.
- Leave lining inside out.
- Place the exterior inside the lining. ie: the right side of the exterior is next to the right side of the lining.
- Line up the top edges of the lining and the exterior.

- Sew the top edges of lining and exterior, matching side seams. This bit might be a little fiddly, as the opening is quite small. If you need to, baste the lining and exterior together before machining.
- Neaten seam.
Turn Bag Right Side Out:

- Put your fingers through the hole in the bottom of the lining.
- Gently pull the right side of the bag out through the lining.

Close Gap:

- Close the gap in the lining by edge stitching, or hand stitch if you prefer.
Topstitching:
- Push the lining back into the bag.
- Press or finger press the top edge of the bag.
- Topstitch ⅛" from the edge, around the top of the main fabric, using a slightly longer stitch.
Drawstring:

- Thread the first cord through the entire drawstring casing. Both ends of the cord will come out of the same opening.
- Repeat with the second cord and the second opening.
- Knot the ends of each cord.

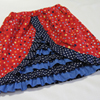
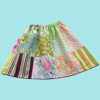
That's it! Your drawstring pencil pouch is finished. Of course, it doesn't have to be used just for pencils. I don't crochet, but I think it would be a good size for crochet hooks.
Alter the dimensions and this bag could become storage for any manner of items. You could even use it as a gift bag.

As you can see, I made two drawstring pencil pouches. Each was part of a larger gift. Stay tuned for another tutorial.

- Leave me a link in the comments
- Add to the ongoing Drawstring Bags link party, here at Threading My Way.
- Tag me on Instagram - @threadingmyway
- Send me an email - link at top right of blog
- Contact me on Facebook
- Add to the Threading My Way ~ Sewn by YOU Flickr group
For more drawstring bag ideas and inspiration...
... Pam
Because of the drawstring cord, this bag is not suitable for children under 3 years of age.
| Tweet |
When this post showed up in my blog reader I thought of you as soon as I saw the fabric in the first picture! If you've used it before, then my sub-conscious remembered, lol. Sweet little pencil case - practical, and pretty :)
ReplyDeleteYour tutorials are always so clear and easy to follow. Thanks so much for joining in at #HandmadeMonday this week :-)
ReplyDeletePam, I love the way you sew the drawstring casing here! I've always done it a totally different way, but I love the effect... especially with all your cool fabrics! Pinned! :) Lisa
ReplyDeleteSo cute!! Thank you for sharing this tutorial!
ReplyDeleteHi there
ReplyDeleteJust stopped by to let you know that I featured this on my Round Tuit post this week!
A Round Tuit 354
Thanks again for linking up to A Round Tuit Hope you have a great week!
Jill @ Creating my way to Success
Happy new year.I like it
ReplyDeleteNow I want to make these, too!!!
ReplyDeleteI made one of these and it was so quick and easy! Thanks for the super tutorial.
ReplyDeleteSuch a great gift to include into my Operation Christmas Child shoe box. Thank you for helping me to make good use of my mountains of fabric!!!!
ReplyDeleteIt's a great project for using up scraps of fabric, Monja.
DeleteHi... I seem to be missing something after you have sewn everything up and you place the exterior inside the lining the only opening to the exterior is the lining gap area. Once you put everything together it says to put your fingers in the hole in the bottom of the lining, but how can I if I've already placed the exterior thru that gap. I don't understand is there something.
ReplyDeleteThank you missing
Hi, Sorry the instructions don't seem to be helping. Can you tell me which photograph you are up to - the one directly under the heading Turn Bag Right Side Out: or the second one under the heading Turn Bag Right Side Out:?
DeleteHi again,
DeleteCan you tell me which steps you have completed...
1. Exterior placed inside interior
2. Top - exterior and interior - sewn together
3. Pull exterior out through gap in interior
4. Close gap
I’m making lots of these today with children in my holiday club. (Ages 5-11) I’ve taken the lining out though as it will be simpler for the children to follow. It’s their first ever sewing project so wish them and me good luck 🤞
ReplyDelete