


If you've been reading Threading My Way for any length of time, you'll know that I like to get creative when giving presents. Drawstring bags are an easy way to cut down on paper and they become part of the gift, too. Today's drawstring bag is a little different, though - it has a panel inside, to divide the bag into two compartments.
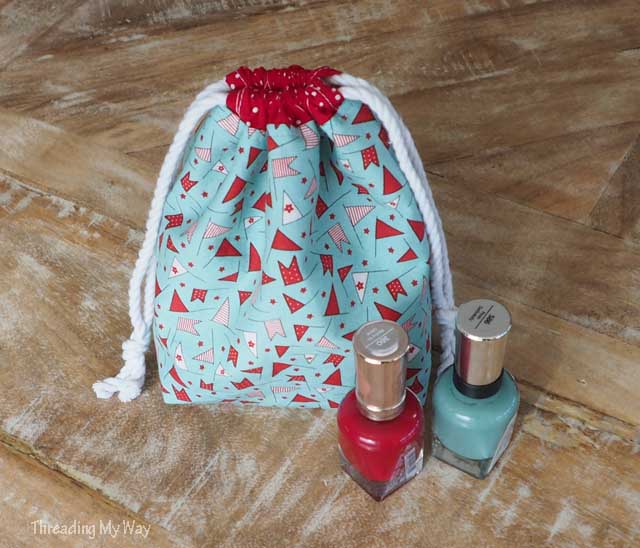
The little bag is designed to comfortably hold six bottles of nail polish. Of course, the contents are limited only by your imagination.

Today's tutorial is the second in the Sew Early for Christmas series...
- Quilted Christmas Wreath Pillow Cover by Susan, from Super Mom No Cape!
- Drawstring Gift Bag with Divider - today's tutorial
- Fabric Christmas Crackers by Joy - Days Filled With Joy
- Snow Globe Coasters by Dione - Clever Chameleon Quilting

With a finished size of roughly 6½" x 4½" x 3" (17cm x 12cm x 5cm) , the drawstring bag holds six bottles of nail polish in an upright position, and prevents them from falling over. With the top folded down, the bag becomes a little holder which could be slipped into a drawer to help with organisation.
Materials:

- 2 pieces - 8" x 8" (20cm x 20cm) - main fabric (patterned fabric)
- 2 pieces - 8" x 8" (20cm x 20cm) - lining fabric (red fabric)
- 2 pieces - 2" x 8" (5cm x 20cm) - contrast fabric for drawstring casing (red)
- 1 piece - 5" x 6" (13cm x 15cm) - bag divider (patterned fabric)
- 2 lengths of cord, tape or ribbon - 21" (53cm) - drawstring
Please note that I work with inches, then convert to centimetres, which I round up or down. For 100% accuracy, take the inches measurement and use an online calculator.
Instructions:
Read all instructions before you begin.All seams are ⅜"(1cm), unless otherwise indicated.
Basting (hand sewing with a long stitch), is a good way to hold seams together while sewing two pieces of fabric together. The fabric won't move, and you don't have to worry about keeping pins away from the machine needle. Another good alternative is wonder clips. If you do use pins, remove them as you sew - don't sew over them!
Drawstring Casing:

- Fold short ends over ¼" and finger press.
- Fold ¼" again and stitch
- Fold in half lengthwise with wrong sides together.
- Finger press
Attach Casing to Exterior Fabric:

- Centre raw edge of casing on right side of exterior fabric.
- Stitch with ¼" seam.
- Repeat for 2nd side.
Sew Exterior Fabric:

- With right sides together, sew side and bottom seams. Be careful NOT to catch the casing in the seam. If necessary, use a ¼" seam allowance. Mine was fine with a seam allowance of ⅜".
- Neaten edges if you wish.
Box the corners:

- Measure 1½" (4cm) from the corner seam (don't measure from the edge of the fabric) in both directions and on both sides of the fabric.
- Put a mark to show where 1½" (4cm) is. You will have four marks for each corner - two on the top, two on the bottom.

- Pull out the sides of the bag.
- Place one seam on top of the other seam, with seams facing in opposite directions.
- Put a pin through the top mark. If the pin comes out through the mark on the other side, the boxed corner will line up.
- If the pin is not coming out through the mark on the other side, reposition the fabric until it does.

- Remove the pin and hold in place.
- With a ruler, draw a line over the mark and across the fabric.
- Sew across the line.

- Cut the fabric and neaten.
- Repeat for the other side.
- Turn right side out.
Sew Lining:

- Fold divider in half, wrong sides together and lining up 5" sides
- Finger press the fold

- Measure and mark 1½" (4cm) from the bottom corner of the lining, in both directions.
- Repeat for the second corner.

- Place the divider on the right side of one piece of the lining fabric.
- Line up the raw edges of the divider with the two marks that are 1½" (4cm) from the corner.
- Stitch together with a ¼"seam.
The next few steps were hard to photograph, so the fabrics have changed. It's also hard to describe, and is the only fiddly part of the construction.

- Take the left hand corner of the divider, and place on top of the 1½" mark on the lining. (You are still working on the first piece of lining).
- You are lining up the two 1½" marks. (See arrows on photo).
- Stitch along the side from the bottom red line in photo above, to the end of the divider.

This is what it will look like from the other side, except that there won't be a gap in your stitching along the bottom, as in photo. The next step is where you will leave the gap. If you leave it here, too, it doesn't matter.

- Place lining right sides together, with the divider sandwiched in between.
- Sew from the top down to the 1½" mark on either side.
- Bring the remaining 1½" mark up to meet the corner. (Photo shows before this is done).
- Sew from corner 1" along the bottom, backstitching where you stop, making sure the corner is folded out of the way. You are only sewing 1" from either corner along the bottom, so as to leave a gap for turning.

- Flatten the corner and sew across at right angles to the seam. This line will be 1½" from the corner.

- Neaten edges if you wish.
- Repeat for the second corner.
- Make sure to leave a gap along the bottom for turning.
This is the first tutorial I've done where I haven't been 100% completely happy with my instructions - just for the adding the divider bit. At some stage in the future I'll see if there's a better way to add a divider that's easy to photograph and explain. I did try the cut out method, but came back to this one. Let me know how you go if you sew one.
Back to original fabric...
Attach Lining to Exterior:

- Turn exterior fabric right side out.
- Leave lining inside out.
- Place the exterior inside the lining. ie: the right side of the exterior is next to the right side of the lining.
- Line up the top edges of the lining and the exterior.

- Sew the top edges of lining and exterior, matching side seams.
- Neaten seam.
Turn Bag Right Side Out:

- Put your fingers through the hole in the bottom of the lining.
- Gently pull the right side of the bag out through the lining.

Close Gap:
- Close the gap in the lining by edge stitching, or hand stitch if you prefer.
Topstitching:

- Push the lining back into the bag.
- Press or finger press the top edge of the bag.
- Topstitch ⅛" from the edge, around the top of the main fabric, using a slightly longer stitch.
You can see from the photo that my casings are not equidistant from the seam. It totally doesn't show in the finished bag. Don't stress if things are not perfect!
Drawstring:
- Thread the first cord through the entire drawstring casing. Both ends of the cord will come out of the same opening.
- Repeat with the second cord and the second opening.
- Knot the ends of each cord.

Your drawstring bag, complete with divider is finished.

There's only one fiddly bit to making this bag - the divider. If you like the shape and size of the bag, but have no need for a divider, or simply want a quick and easy sew, leave the divider out.
Drawstring bags, whatever their shape and size, really are a good way to present gifts - two gifts in one - it's a win/win!
Even though my bag is made for Christmas, you'll notice I haven't really used Christmas fabric - Christmassy colours, but not fabric designed for Christmas. That way, the recipient can use the bag all year long...
- Wishes, by Sweetwater, for Moda
- Contrasting red fabric without a name on the selvedge
Have you ever presented a gift in a fabric bag, instead of using wrapping paper ?

- Leave me a link in the comments
- Add to the ongoing Drawstring Bags link party, here at Threading My Way.
- Tag me on Instagram - @threadingmyway
- Send me an email - link at top right of blog
- Contact me on Facebook
For more drawstring bag ideas and inspiration...


... Pam
| Tweet |
Thank for the tutorial. I've never used fabric for a gift bag. I love the idea.
ReplyDeleteThanks, Sharon. Well worth the effort, I think.
DeleteWhat a neat little bag I could see a whole manicure kit in these they would make lovely gifts for my daughters in law thanks for the tutorial Pam.
ReplyDeleteOh cool! I was just thinking the other day that I should make something to put my nail polish in! Thanks for sharing! xx
ReplyDeleteLove the double-duty-ness of this project, Pam. Nice job, and cool fabrics, too. (I believe the part about adding a simple divider like this is inherently easy, but as you have found out, it may be more difficult to describe and show.)
ReplyDeleteGreat idea and great tutorial!
ReplyDeleteLately i crocheted a moebious shawl for a friend. Knowing she will carry it with either in her usual bag or in her professional items bag ' u decided to make her a cloth drawstring bag as well. To keep the moebbious well between the the things she carries in her bag. Now i consider adding a sewn bag like that with every knitted item i make as a gift .
ReplyDeleteWhat a cute project, and far nicer than wrapping paper. Thanks for sharing. :)
ReplyDeleteThis is a great gift-and-wrapping-in-one idea. And it's very pretty too. Thanks for your tute :)
ReplyDeleteVery cute, and a GREAT idea, not just for nail polish. Thanks for sharing a nice detailed tutorial that should make it easy to follow along, step by step.
ReplyDeleteHi Pam, thank you for the tutorial! It's really cute.
ReplyDeleteThanks so much!
DeleteI love the way you've added the divider, I have a couple of nieces who love doing their nails, I think their Christmas gift idea might be sorted already!
ReplyDeleteGreat totirial. I have 2 granddaughters that will love this.
ReplyDeleteGracias por el tutorial. Haré lo posible por hacerla, es una asignatura pendiente que tengo por realizar, y con este tutoriales lo tendré fácil.
ReplyDeleteTe ha quedado de lujo, es preciosa.
Me inscribió y te sigo.
Besos y feliz fin de semana!!!
Muchas gracias por visitarnos. Espero que te diviertas haciendo la pequeña bolsa de cordón.
DeleteThis is going to be really useful for back to school too! Thank you for sharing the tutorial at The Really Crafty Link Party this week. Pinned!
ReplyDeleteInteresting to have a divider in the bag. Thanks for sharing it.
ReplyDeleteThanks for the tutorial. I've never seen a drawstring bag with a rectangular base. I think this would be very useful for carrying small handwork projects without getting everything tangled while on the move.
ReplyDeleteSuch a lovely bag Pam. Perfect for tidying my nail polishes away :) Thanks for sharing at Creative Mondays.
ReplyDeleteSuch a great idea! Thank you for the wonderful tutorial.
ReplyDeleteThat is so cute! It is a perfect Christmas gift.
ReplyDeleteI will be making this for gifts!
plaidandsugar.blogspot.ca
Thanks so much, Loren. Love to see pics when you make some.
DeleteLove this! Thanks for sharing with us at the To Grandma's House link party!
ReplyDeleteWhat a sweet, little bag! Thank you for sharing. You are one of the features at the Make it Pretty party at The Dedicated House. Here's the link to this week's bash: http://www.thededicatedhouse.com/make-pretty-monday-week-261/ Have a great week! Toodles, Kathryn @TheDedicatedHouse
ReplyDelete