


I was lucky enough to be given a man's slim fit, cotton Calibre shirt in a small size. Although it's been well worn, the only signs of slight wear are across the shoulders. I want to keep it as a shirt, mainly to be worn in Summer to protect me from the sun, but also maybe to dress it up and wear under a blazer.

Here's the before shot. 3/4 flared pants are not the right pants to wear with a long shirt, as my legs look rather short. Perhaps skinny jeans would have been a better choice.
As it's to be worn in Summer, I want the shirt to be loose fitting. It's a little wide across the shoulders, but I can live with that. I'm hoping that shortening the sleeves is the only alteration I need to make.
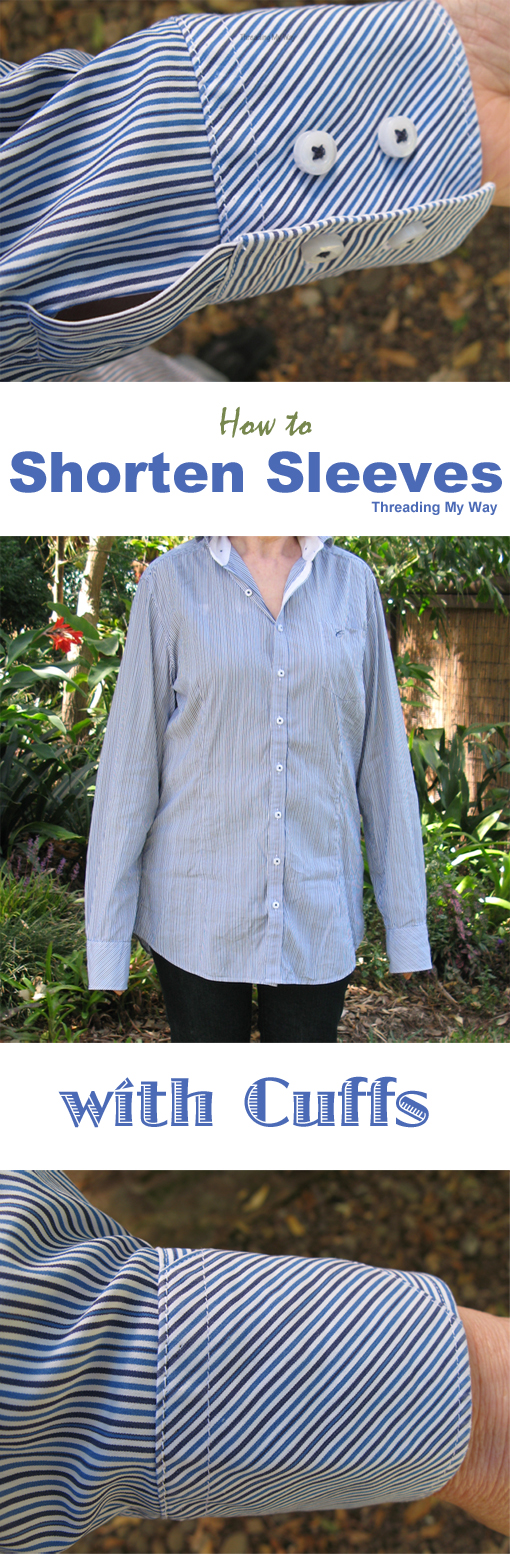
Cuffed sleeves have an opening that extends past the cuff. To be able to shorten the sleeves and still have a cuff, the amount of fabric you cut off has to be less than the opening, so that there will still be an opening after the cuff is reattached. Without the opening, it may be too tight to go over the hand. You could, of course, redo the opening entirely, but I haven't covered that today.
Here's how I shortened the sleeves...

- Measure how much the sleeve needs to be shortened.
- Unpick the stitching that holds the cuff to the sleeve.

- Cut off the excess fabric. I cut off 3"; roughly the width of the cuff. I couldn't have gone much shorter than this without totally redoing the opening above the cuff.

Sandwich the sleeve between the two sides of the cuff:
- Start pinning at the end with the buttons.
- Make a pleat or two towards the buttonhole end, using the untouched sleeve as a guide. I made two pleats and just eyeballed them (no measuring).

The picture above is a close up of the pleats.

- Hand baste (long running stitch) the sleeve to the cuff and remove pins.
- Edge stitch on the exterior side of the cuff. I line up the edge of the cuff with the inside edge of the presser foot and move the needle two positions to the left (this will differ from machine to machine). My stitching ends up about 2mm from the edge. (I usually give measurements in inches.. I can visualise 2mm, but I cannot visualise 5/64". For those of you who use imperial measurements, sew really, really close to the edge, hence the term... edge stitch.)
- Backstitch at the beginning and ending of the stitching.
- Remove basting stitches.

Ta-da... one shortened sleeve. You can see how easy it is to take off a cuff and reattach it.

The photo above shows the difference in the length of the opening above the cuff; before and after.


So, am I happy with my altered shirt? I like my sleeves slightly long, so I'm more than happy with the altered sleeves and it certainly looks better after ironing. However, I still think my legs look too short and this time, I'm not convinced the fault lies with the straight leg jeans. I think I'd say the same thing, even with skinny jeans. The shirt is just too long!!!

Adding a blazer to the outfit didn't have the desired effect. It accentuates the fact that the shirt is loose fitting.
It's funny... When I looked in the mirror, both with and without the blazer, I was happy with the look of the shirt. As soon as I looked at the photos, I could more clearly see what the outfit really looks like... what works and what doesn't. I'm not sure why that is.

For a better fit and a more feminine look, I need to shorten the length and take the shirt in!!! What do you think?... honest comments only!!!
It's all academic now, as I discovered a small tear in the back of the shirt while I was ironing it. I'll still wear it as a cover up from the sun (after I've patched the tear), but it's not worth the time and effort to do any more alterations, given the condition of the shirt. Lesson learned... carefully check pre-loved garments BEFORE altering... LOL!!!
So, I've altered the title of the post from Shirt Refashion to How to Shorten Sleeves with Cuffs.
... Pam
Wonderful tutorial. Husband has recently been asking me to alter his shirts so I will keep this in mind. I shared it on Facebook so that I don't forget.
ReplyDeleteEddie's room on Facebook for crafty ideas and conversation
Cryptocurrency prices have suddenly surged. People ask if now is the best time to invest? before jumping into conclusion i think you should take a look at things first. BTC price is gearing for a massive move upwards, even though the crypto market has been recording many downturns this 2023, the instrument seems to hold its ground. Investors who bought early are still in profit despite the recent price crash and they also earn by trading. There has been a lot of interest in BTC trading, many investors and newbies are actively engaging in the trade on platforms where they can accumulate more profit. We should follow the way of earning more regardless of the current market (bulls or bears), which is trading. Buy the dip now and trade, I have made $10,000-$20,000 profits not just by buying the dip but implementing trades with signals supplied by my broker Mr Bernie Doran, his trading signals and strategies are 100% accurate . He can be reached on Gmail : Berniedoransignals@gmail.com or WhatsApp : +1(424)285-0682
DeleteIf you're going to shorten this, you could use the extra fabric to make a patch. Matching the stripes will camouflage the patch very effectively. I have done this with patterned fabric, and find that they hide patches much better than solids. Now I will admit that when I shorten sleeves, I merely make a pleat in the sleeve fabric, close to the cuff.
ReplyDeleteGood point about the stripes camouflaging the patch, Donna.
Deletegreat job on shorting the shirt, you can type in alter or refashion mens shirts on pinterest & come up with all kinds of ideas, I'm going to get ahold of some of my hubbys shirts lol!
ReplyDeleteHelen
Why didn't I think of this??? Your making me a whole lot braver in the sewing room lately. As for the fit of the shirt, I think just shortening it might do the trick.
ReplyDeleteI think it was a worthwhile post, and I certainly learned something by reading it. I don't think the pictures look as bad as you think, but I also think most people are more critical of themselves than others. :-) If it wasn't so worn out, then I would agree that a slightly shorter hem would look a little less casual, but I thought it looked okay under the blazer, if a bit long. Thanks for sharing how to shorten the cuffs!
ReplyDeleteI never find full sleeves shirts for my hand length :) Its always over long for me.. So i drop them off in the trial room itself. Thanks for sharing how you made it... I feel it looks good:) Probably the sleeves near the armsyce is a little baggy.. But thats still ok I feel..
ReplyDeleteyou look cute, Pam! I like the shirt with the blazer. Great tutorial. I have short arms so long sleeves are always a problem for me. :-)
ReplyDeleteI'm with dannyscotland - I think the shirt was a little too long, but it did look good with the blazer! But that's all academic now, so I'll just say --- Pam, you're a lovely lady, whether your shirt is too long or not --- and that's me being honest, as requested :D
ReplyDeleteI think on you a shorter overall length would work better...so keep that in mind next time you alter a preloved shirt!;) That's a clever way to shorten sleeves. Too bad we're in the other camp and need longer sleeves.;)
ReplyDeleteThe shortened sleeves look great! This was a great tutorial - I didn't even think about using pleats to disguise the larger armhole you make when you shorten the sleeves. They look great.
ReplyDeleteI think the shirt is a little long, but it looks fine - if a little casual - under the blazer.
Great tutorial. I think it would definitely look better if you shortened it a bit.
ReplyDeleteWill darts in the front and/or back make it fit better? maybe include the hole?
ReplyDeletegood tute I need just the opposite...length!
Darts are a fabulous idea and would work well to hide the tear.
DeleteI left out deeper darts
ReplyDeleteI loved your idea and you did ask for honest comments this is how I would have tackled it...your not wrong and your way works this is just a different idea.....I think the shoulders are toooo droopy for your small frame. I would have tried to pull the shoulder yoke up and pinned a tuck in the yoke. this would take care of the sloppy look of droopy shoulders and bring the cuffs more in line with you arm length. the other thing is I think the cuffs are too big, long for your small frame. I would have removed the buttons made 2 more button holes and wear cuff links. this would half the size and making 2 more button holes on the other side of each cuff is real easy. for cuff links you could take two buttons with shanks and sew them together with a heavy thread loosely. then you could just button them closed until you either found cuff links or make some with your favorite bling. I also didn't like the shirt tail. I think if it was shortened you would like it better it just seems to overwhelm you frame. oh I forgot when you take the tuck in the yoke I like to flatten it kind of like a pleat . Just push down on the extra fabric till you have the same amount of fabric on both sides then use decorative stitching, sew on a button, or charm, or bows what ever you like to keep the extra fabric in control . you could even use the same buttons as you used for the cuff links. one more idea to cover up stains, or small tears i try and think of an applique that I can incorporate for the shirt. I immediately thought of lady bugs or strawberries. You could applique them from the back to the front on one side and have them come down the front to about your collar bone. or thread stitch fireworks the same way and this would hold down one of the pleated yoke change. You could even change the buttons to different colors, strawberries, bugs, the ideas are endless once you think about it. I hope I haven't overwhelmed you! when ideas hit I just type them so I don't forget. you might not want to put this much work into the shirt but you could always look for another shirt!! hope this helps or is just fun to read! kathleen
ReplyDelete!!! I agree! Women's shirts typically don't have such LONG cuffs! I like the idea of creasing it in half, adding two more button holes and making it a french cuff top!
DeleteI also think darts would help tremendously. You're so slender; this is swamping you. It's good for a swimsuit cover up right now, but if you put darts in and made it a touch more fitted, that would work wonders.
I like the idea someone else had of reworking the yoke. I am not seeing any pics of the wear on the shoulders so I don't know what we're trying to camouflage there, but r pulling the shoulders in and maybe adding a pleat? something to make it less wide... even with it's slim fit, it's just... swamping you as a dressier top to wear with jeans.
@kluvstosew...Thanks so much for contributing to the discussion. I didn't think of folding the cuffs so you could wear cuff links. This would certainly dress up the shirt! And yes, I'll be taking the next one in across the shoulders. I've been given a few more shirts, so lots to play with.
DeletePam, you did a great job, even if the final product didn't work out. I don't know enough about refashioning/alterations to offer any honest suggestions, but I just think it's too big on your petite frame. Would it have worked with leggings and a cute belt? Don't know...I'm pretty boring in my wardrobe! Thanks for sharing your process for those of us who are clueless.
ReplyDeleteI think you could sew some elastic on both sides of your waist. As to the length i am having the same problem with a Jeans shirt, and haven`t made up my mind about making it shorter although i am not happy with the length of mine.maybe after you elasticate you will have a better idea what to o with the length.
ReplyDeletemirjam
I used to do this on my husband's shirts, but have not done any for a long time. Your friend gave you a great shirt and you did a wonderful job in altering it. Call me crazy, but I really like the length of this shirt on you and it looks terrific layered under your jacket. It would also look fab with a pair of jeggings or leggings. It is not always easy to find the longer shirts in stores and I was thinking, just yesterday, that I should get to work and make some longer ones(maybe some short-sleeved ones for spring and summer). Thanks for sharing this great tutorial with your readers!
ReplyDeleteThanks so much for contributing to the discussion, Lynn. I don't own any leggings, but I'm definitely going to buy some. I've been given some more shirts, so I'll be able to experiment.
DeleteGreat pics and instructions! I am going to teach this very same technique next week at an alterations clinic I run in Flagstaff! Perfect timing for me to see this!
ReplyDeleteThanks, Tina. Redoing the cuffs is such an easy alteration.
DeleteI need to shorten a few sleeves on my shirts.
ReplyDeleteI love that you're sharing how to do this. From being a teenager I used to 'turn' the collars and cuffs on my dad's shirts for him so he could continue to wear them once the top side had worn. I know this isn't the same thing here but it's the same sort of principle of removing the cuff and then reapplying it and I don't know anyone anymore that would bother to turn a collar or cuff, they'd just buy new - to be fair some shirts may not be made well enough on the 'inside' these days to be able to turn them! It's great that you're sharing techniques like these with everyone :)
ReplyDeleteForgot to mention I'm dropping by on this occasion from 'New To Me'! :)
DeleteThis is a really neat tutorial! I personally take the sleeves out of jackets and tops and shorten them there. It also makes it easier to take up any extra room in the sleeves.
ReplyDeleteHave a good day!
This shirt looks great now! Thanks for sharing your new to me project with such a good tute :)
ReplyDeleteGreat little tute Pam! And it looks like you've got lots of great suggestions for more shirt refashions!
ReplyDeleteThanks for linking to a Round Tuit!
Hope you have a fabulous week!
Jill @ Creating my way to Success
http://www.jembellish.blogspot.com/
Wow, that'a great tutorial. Thank you.
ReplyDeleteI have short arms so even when the garment fits everywhere else it still hangs over my hands. Pinned because this is a great tutorial. I love the ideas in the comments about how to tailor the rest of the shirt, too -- even if you aren't using them for this shirt. I love great fitting clothes but have been afraid to tackle some of the issues like shoulder fit -- good ideas there!
ReplyDeleteA Pinch of Joy/
You make shortening a sleeve looks so easy. I thought it would be really hard. I like the look of the shirt with the blazer...without the blazer, it does look like it needs to be shortened. Shortening the sleeves sure makes a huge difference though.
ReplyDeleteThanks so much for linking up at the Real Family Fun link party! Hope to see you next week.
KC
This is such a cool, practical tutorial. I was really excited when you originally posted it because I needed it that very week. Thanks for linking up!
ReplyDeleteLove the transformation!
ReplyDeleteWow You have shared a great knowledge and idea .This is really impressive and this helps me a lot as a fashion lover.
ReplyDeletehttp://www.apparelnbags.com/womens-t-shirt-short-sleeves.htm
Super tutorial and pics. You're readers do have some thoughts that I certainly wouldn't have thought about because I was too busy looking at the great job done on the cuffs.
ReplyDeleteHi Pam! I actually founds you because of sweet sharing Monday for another post but I found this awesome gem! My husband needs his sleeves shortened all of the time. It drives him crazy when they are to long...thank you so much for sharing! I hope you have a lovely day!
ReplyDeletexo,
amber
Hi Pam, completely honest: I actually like the shirt on you over jeans! I think it's a great look for casual wear - we don't always want to wear fitted shirts.
ReplyDeleteI feel that it could do with shortening to wear under a blazer and I saw a great option for a shirt hem that I think would be easier to do and would look good too. I read about this recently at Off The Cuff Shirtmaker's blog (http://off-the-cuff-shirtmaking.blogspot.co.uk/), she calls it a chiselled hem: angled sides and straight at the bottom, i.e. with two "corners". I think it looks great and may be an option for this shirt, if you want to mess around with a shirt where it doesn't much matter if it comes out right, treating this as a muslin version.
Love the idea of alterations and making a preloved item fit you! Great job, looking forward to reading your other blog posts! (I only just happened across this one)
You did a great job of shortening the sleeves Pam and have lots of ideas in the comments to work your magic on the next one! :)
ReplyDeleteGreat easy to follow tutorial You made it look so easy. I have the perfect shirt to test it out on. Thank you.
ReplyDeleteI have no doubts you'll find it easy, Jeannie. Let me know how you get on.
DeleteThe pleats in the sleeves don't seem to be flat [I've tried that and it looks bad.] Seems that they are angled or flared out to create a puff in the sleeve above the cuff. I can't seem to do this correctly. Any thoughts? Maybe there is an explanation on the web somewhere...
ReplyDeleteGrab a shirt that has a sleeve finish like this - might make it easier to visualise. I only have two pleats and didn't measure them. I just folded them a couple of times till they looked right.
DeleteI know this is a very late entry into the comments, but thank you very much for the information. I think your shirt looks awesome with the blazer.
ReplyDeleteAs for myself, I am short shouldered. No matter the shirt type, the shoulder seams will fall off of my shoulders. You can probably imagine how often I must pull my bra strap back up!
I don't know why designers think that because a woman wants a "Boyfriend" shirt, she must want the really long sleeves too. The same for plus-sized shirts. I buy a size 16 or 18 blouse due to bust size (36DD), and the sleeves fall 5" Below the tips of my fingers.
I recently bought what could be my favorite shirt (an Ava Viv 100% Lyocell long sleeve w/ cuffs), and it is 6" too long at the cuffs. I was going to just whack the sleeves off to a 3/4 length sleeveand hem it, then saw your directions. I am going to try it this afternoon. I can't wait!
Thank you again!
Thanks for the comment, Rosemary. Glad the tutorial is of help to you. Hope it all worked out OK.
Deletethanks for share this information
ReplyDeletethank you very much for the information. I will definitly looking to it
ReplyDeletea white work shirts is an essential piece that should find a place in every professional's wardrobe.
ReplyDeleteThis information is so awesome to read and gained a more about this. Keep sharing us a more beneficial posts ahead too...
ReplyDeletedivorcios en nueva jersey
Indulge in unparalleled vitality with Monster Rabbit, your gateway to exquisite wellness. Infused with royal performance honey, our products redefine the essence of natural energy and vitality. Elevate your lifestyle with Monster Rabbit, where potency meets pleasure for a truly invigorating experience.
ReplyDeleteYour ideas for graduation decorations are so inspiring! The mix of elegance and fun is exactly what I was looking for to make the event unforgettable.
ReplyDelete"Such a helpful and detailed guide! Shortening sleeves with cuffs can be tricky, but your step-by-step instructions make it so much easier to tackle. I really appreciate the tips and the clarity in the process—definitely going to try this out myself! Thanks for sharing your expertise!"
ReplyDeleteHow Much Does a Car Accident Lawyer Cost
Thanks for the tutorial on how to shorten sleeves! I like it! Rescreening Ocala FL
ReplyDeleteA focused profile built around flexfit 6533 cap, emphasizing knowledge of premium headwear that offers a structured fit, long-lasting comfort, and modern style. With an understanding of fabric performance and design quality, the attention is on caps that work well for branding, casual wear, and professional use. This profile reflects appreciation for reliable construction and clean aesthetics in everyday apparel choices
ReplyDelete