


Sometimes I need an extra large tote to carry things from one place to another. Nothing fancy, no need for pockets, just a bag that will let me carry largish items easily. Today I'll show you how I made my No Frills Extra Large Tote. It's a super quick and easy make.

When recently packing for a holiday, I realised I didn't have a bag large enough to put my pillow in, other than heavy, bulky suitcases. My pillow was only going to sit on the back seat of the car, but packing it in a light bag meant I could pop other things in with it and that would leave my hands free to carry other things when we reached our destination. So, I made my new bag large enough to fit a pillow.
Materials:
- 2 pieces - 29 inches x 21 inches (74cm x 53cm) - home decor weight exterior fabric
- 2 pieces - 29 inches x 21 inches (74cm x 53cm) - lining fabric
- 2 lengths cotton webbing - 68 inches x 1.5 inches (173cm x 3.8cm) - straps (handles)
- 2 pieces grosgrain ribbon - 13 inches (33cm ) - tie for the top of the bag
When cutting exterior and lining fabric:
- 29" (74cm) = Width
- 21" (53cm) = Height
Thanks, Wholeport. for giving me the supplies used in this project.
- Paint Pattern Design Cotton Canvas ~ exterior fabric
- Cotton Decorative Purse Strap (Webbing) ~ straps
- Light weight cotton fabric from my stash ~ lining
Instructions:
- All seams are 3/8" (1cm), unless otherwise indicated.
- If using a home decor weight fabric, neaten the edges of all cut fabric before you sew it.
- When pressing, be careful to stay well away from the ribbon, as it will melt easily. If using webbing that is not cotton, keep it away from the iron also.
- If using home decor weight fabric, use a needle for thicker fabrics, such as a denim or jeans needle.
Sew straps to exterior fabric:
Each 68" piece of webbing forms one handle. I used cotton webbing which is very easy to sew. I have never sewn with synthetic webbing, but I feel it is probably harder to sew.
- Starting at the bottom of the exterior fabric, pin the strap 9" (23cm) from the side of the bag.
- Take the other end of the same strap and pin 9" (23cm) from the other side.
- Baste the straps in place (hand sew with a long running stitch), stopping 1" (2.5cm) away from the top edge.
- Remove pins.
- Topstitch 1/8" (3mm) from either edge of the straps, stopping 1" (2.5cm) away from the top edge. I increased my stitch length to 3 for the topstitching and used a contrasting coloured thread.
- Find the midpoint and sew ribbon to the top edge of the exterior, sewing 3/8" (1cm) from the edge. Sew a couple of times to secure and zig zag the top edge. (I used 2" wide ribbon, but I think a narrower ribbon would tie more easily.)

Baste straps to exterior fabric.

Mark 1" from the top edge, baste and then sew on either edge of the strap to that point.

Attach ribbon.
Confession time... I measured incorrectly and cut each strap to the wrong length. I wasn't wasting the webbing, so I joined it. When I'm carrying the bag, I don't notice the join, but I can see it clearly in every single photo. Do as I say, not as I do... measure twice and cut once, then your strap won't look like this.

- With right sides together, sew the side seams and bottom seam.
- Sew the two side seams first, each time starting at the top.
- If you didn't neaten the edges at the very beginning, do so now. Do NOT sew the sides of the seams together. Sew each side separately.
- Press seams open. Don't worry that you can't press the seams open at the corners. You are going to cut these off later.
Making the box corner:
- Measure 3" (8cm) from the bottom corner seam in both directions. (Measure from the seam. Don't measure from the edge of the fabric.)
- Put a mark to show where 3" (8cm) is. You will have four marks, all 3" (8cm) from the bottom corners.
- Pull out the sides of your bag.
- Place one seam on top of the other seam.
- Put a pin through the top mark. If the pin comes out through the mark on the other side, your boxed corner will line up.
- If the pin is not coming out through the mark on the other side, reposition the fabric until it does.
- Make sure the seams are open.
- Holding the fabric in place, take the pin out and re-pin away from the marks.
- With a ruler, draw a line across the fabric, at right angles to the seam and through the mark you made.
- Remove the pin. If you would like, hand sew to hold in place.
- Sew across the line. I sew a couple of times for reinforcement.
- Cut the fabric and neaten.
- Repeat for the other side.
- Turn the exterior right side out and press.

Measure 3" from the corner seam.

Line up the seams using a pin.

Rule a line to stitch along.

Sew boxed corner.

Finished boxed corner.
Sewing the lining:
The two lining pieces are joined in the same way as the exterior fabric, except that an 8" (20cm) gap is left in the bottom seam, to allow turning later on.
I used a thin cotton fabric for the lining and I neatened the seams after I had sewn the two lining pieces together. Neaten either side of the seam separately and press seams open. Make boxed corners the same as for the exterior fabric.
Attach the lining to the exterior fabric:
- Place the exterior inside the lining. ie: the right side of the exterior is next to the right side of the lining.
- Line up the top edges of the lining and the exterior. Tuck the straps and ribbon in between the exterior and the lining.
- Match the seams on either side, making sure the seams are open.
- Baste (hand sew) the top edges of the lining and the exterior to hold in place.
- Sew a 1/2" (1.3cm) seam to join the top edges of the lining and the exterior, making sure you DON'T catch the strap in the seam
- Zig zag around the top edge.

Place exterior inside the lining.

Baste the top edges and then sew.
Turn the exterior right side out:
- Put your fingers through the hole in the bottom of the lining.
- Pull the exterior out through the lining.
- Close the gap in the lining by sewing a row of stitching near to the edge.

Pull the exterior out through the lining.
Finishing off:
- Push the lining back into the bag.
- Press the top edge of the bag, making sure the iron doesn't come in contact with the ribbon (or with any synthetic webbing). Place a damp cloth over the sections with the ribbon to press. I used a damp cloth when ironing over the cotton webbing, too. If you would prefer, you could finger press instead of using an iron.
- Topstitch 1/8inch (3mm) from the edge, around the top of the bag. You will topstitch through the straps.
- Sew a box with a cross in the middle, to secure the straps to the bag.

Topstitch around the top edge.

Secure the strap by sewing a box and a cross.
That's it... you've finished. With all the photos, this might look like a long project, but it's not. The tutorial is taking way longer than making the actual bag.
I've made my bag to fit a pillow, but I know I'll be using it for carrying other largish, but not too heavy, items.

It had just begun to sprinkle lightly with rain, as Mr TMW was taking the photos yesterday. Just as well we took them yesterday, because it's been raining ever since. Mind you, I'm not complaining, as we BADLY needed the rain. And it's been good, soaking rain. Great for the garden and it will have been welcomed by the firefighters working in many areas of NSW.
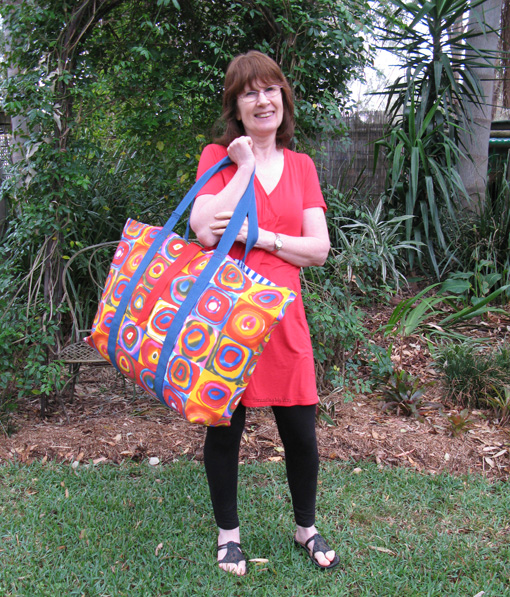
Just in case you were thinking I changed outfits mid photo shoot, the first photo was taken the day before the others.... a bad hair day and lots of really dorky looking photos I wasn't prepared to share. Perhaps I'm too vain... LOL!!! But I know lots of you feel like I do... very awkward in front of the camera!!! I'm slowly learning to relax a little and Mr TMW is generally very patient taking photos for my blog.
If you make a No Frills Extra Large Tote using this tutorial, I'd love you to share pics in the Threading My Way ~ Sewn by YOU Flickr group or leave me a link in the comments.
... Pam
 Tweet
Tweet
The bag looks great, Pam! It's a great size. The bag would be perfect to use for the beach/waterpark too. Especially, if you're like me and you have to bring 6 towels!lol
ReplyDeletebtw, you look nice! I like the tunic that you're wearing.:)
DeleteLinda maravilhosa amei sua bolsa
Delete
DeleteObrigado, Jancer.
Awesome bag! Thanks for the tutorial.
ReplyDeleteGreat post PAM . And hoe delightfully modeled !!!
ReplyDeleteOver the years i made special big bags to carry my Art Works , either to or from places where they were exhibited, or to lectures where i showed them. I also used to have a weaving frame for which i made a special bag from an old skirt , thus you can imagine the size.
mirjam
What a great tote and I think it is even bigger than the one I made last year!! My daughter grabbed it so I might have to make another like yours! Love all the photos too! Thanks for sharing.
ReplyDeleteFreemotion by the River Linky Party Tuesday
This bag is huge! I just love it! Big bags are great for traveling. I give one to each girl and they just throw in it whatever they want to take to Grandma's. If it fits in there, they cant take it. Once it is full then they have to stop! :)
ReplyDeleteLove that idea, Gina!
DeleteWow that is a huge bag! The size and the bright print got my eyes, and I did not even notice the strap joint until you mentioned it :) I like how the straps are wrapped around the bag. Thank you for the tutorial!
ReplyDeleteLove your fabric on the bag Pam.
ReplyDeleteOh yes that is a nice size bag! I do take my pillow with me when I visit my sons. That would be perfect.
ReplyDeleteSuch a timely reminder for me Pam to make one of these. I was just carrying my large quilt with me to quilting today with the big round hoop on the part that I am hand quilting. I was so thinking I need a bag for this :)
ReplyDeleteThere is nothing better than a tailored bag, this tote is the best!
ReplyDeleteThanks for the tutorial!!! Love the color of the fabrics :)
Marisa from http://passionetcouture.blogspot.ca/
Fab tote Pam, and you're looking great too :D
ReplyDeleteGreat bag I need to make a big bag for all the dog stuff we take on holidays with us, I might try this sometime.
ReplyDeleteGreat bag Pam :) thanks for sharing at Creative Mondays...
ReplyDeleteLove this bag Pam - such a useful size - and I like Amy's suggestion that it would make a great sleepover bag!
ReplyDeleteThanks for linking to a Round Tuit!
Hope you have a fabulous week!
Jill @ Creating my way to Success
http://www.jembellish.blogspot.com/
Thanks for the tutorial. I think I will make a few of these for the friends I quilt for. They can have their own bag when they bring a quilt to me.
ReplyDeleteOh Pam. With summer beach weather well and truly in full swing here, I could do with a few more of these. Thanks for the tutorial and for linking up, as always. I'm featuring this one tomorrow.
ReplyDeleteAnne xx
I Love it, I want to make a few of these for the kids for when we visit my MIL
ReplyDeleteI'm making these for graduation presents this year. So excited to get started!
ReplyDeleteJust saw this on your sidebar and do not know how it missed it before. I've been looking for an oversized tote idea for the upcoming beach trip. My present one just isn't large enough. It ends up being stuffed so much that my arm is sticking out uncomfortably. This really is my favorite sewing site. I know I will always find fun, useful, DOABLE projects here.
ReplyDeleteI came to your site looking for a tote bag to make....I knew I would find one here! I got a silhouette Cameo for Christmas and I want to make a bag to put initials on for a gift! This will be perfect.
ReplyDeleteThank you for your extraordinary bag! It would make a great sleepover bag!! Pillow, sheets and favorite stuffed animal and of course change of clothing. But I like the fact that it is so gynormous!!! It doesn't have to be for the end of the world. It can just be during this age, to save the carry, up, up and away! lol
ReplyDeleteThanks so much. I have to make another couple. My son borrowed mine.
Deletegood
ReplyDeleteI'm making a dozen of these for our local children's shelter - they are PERFECT for the poor kids who show up with everything they own in a garbage bag. When I showed my first one to friends in Colorado, they immediately setup a sewing party to make these for the children's shelter close to them. Just wanted you to know that your work is going to a very good cause!
ReplyDeleteThat is wonderful, Liz!!! I'm absolutely thrilled that a tutorial I have written is helping kids on the other side of the world. Thanks so much for letting me know.
DeleteHow deep is the bag? I need to make one 6" deep. Thanks ou.
ReplyDeleteMine ended up at 6" deep, Roberta.
DeleteHELLO -- what are the finished dimensions of the bag? I'm looking for something eco-friendly that can be used for groceries.
ReplyDeleteMy bag ended up at 17½" x 21' x 6". If carrying heavy groceries, I'd reinforce the stitching and seams by using a triple stitch and a double row of stitching. I would still limit the number of heavy items.
DeleteWe just got back from a beach vacation and went through 3 of those big $1 bags from TJ Max or Joann’s trying to take stuff to the beach. They weren’t big enough and the handles ripped right off. I came home and searched for a tutorial on making a huge sturdy bag and I found this which is perfect! I bought “outside” material with enough to line the bag too and will be making it soon! Thanks for the help!
ReplyDeleteGlad you found the tutorial, Gretta. My son borrowed my bags so I made myself another couple. I use them all the time.
Deletethank you so much.... sending blessings from Powder Springs GA USA
DeleteI Love to sew and this is Awesome.. ps..I am 76 keep up the great work
sheila
Hi from the Land Down Under, Sheila. While we're in the middle of Summer, you'll be experiencing cold weather. Enjoy your sewing!
DeleteThIs was an easy pattern to make. I cut a vinyl tablecloth as my lining to make it easier to slip pillow & blanket in & out. Thank you for this extra large tote pattern!
ReplyDelete