
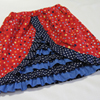


The blue and mauve baskets are made using my Fabric Basket Tutorial, yet they look totally different to the original basket. It's super easy to alter the tutorial to come up with a different look.
Here is the original basket...

Original Fabric Basket
|
Modified Fabric Basket
|
| - cut fabric 10" x 8" | - cut fabric 8" x 7" |
| - medium weight sew in interfacing | - cardboard like iron in interfacing |
| - 1.5" boxed corners | - 2" boxed corners |
| - rectangular shape | - square shape |
Where as the original is a rectangular shape, the modified basket is a square shape, with the sides being roughly 4" each. To make the square shaped basket, the fabric was cut slightly smaller and the boxed corners were made slightly larger.
2" boxed corners will give a side measurement of 4". Add this measurement to the front measurement, plus seam allowances and you have the width of fabric needed. I didn't add seam allowances, mainly because I prefer to work with whole numbers, so my baskets aren't perfectly square, but I don't think you can tell. They're maybe out by 1/4" - 1/2".
The height of the basket is determined by the size of the cut fabric and whether there will be a turn over.
Fabric height = finished height of basket + two seam allowances + width of boxed corner (from seam to corner) + turn over (if there is to be one).
Perhaps the biggest alteration to the original basket, is the different interfacing used. The blue and mauve square basket, has a very heavy iron in interfacing. It's just like cardboard and therefore holds its shape well. This also meant that it was difficult to turn the basket right side out, and the interfacing creased in the process, just like cardboard would if you fold it. Thankfully, ironing took the creases out.
Batting (wadding) could be used as well as, or instead of, the interfacing. It all depends on the look you are after. Another consideration is whether the baskets will be hand delivered or posted, if they are for someone else. My latest blue and mauve square baskets were given in person at Christmas. Had they needed to be sent through the post, it would have been difficult to pack them, as they are too stiff to fold.

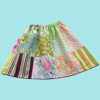
This pink fabric basket is made using the original instructions. To see more variations, check out Sewn By YOU, projects sewn by readers. If you make one of these baskets, feel free to add pictures to the Threading My Way ~ Sewn by YOU Flickr Group.
Basically, the key to modifying the original fabric basket tutorial, is to experiment with measurements and interfacing, to achieve the look you are after.
... Pam
I LOVE the blue and mauve fabric!
ReplyDeleteLindas!
ReplyDeleteJu
They are all so pretty. I wanted to make some of these in 2012 and never got round to it so hopefully this year.
ReplyDeleteVery cute! I’m a new follower. I saw your link on Creating my Way to Success. I would love for you to come by and share your creativity with my friends @
ReplyDeletehttp://www.flusterbuster.com/search/label/Fluster%20Muster%20Party
Robin@ Fluster Buster
Fluster Muster Linky Party - Wednesdays
Hi Pam, lovely fabric the blue one!
ReplyDeleteHave a great Year!
Hugs from Portugal,
Ana Love Craft
www.lovecraft2012.blogspot.com
Hi Pam! I just love these baskets. Very cute!
ReplyDeleteI'm having a GOOGLE + Social hop. I'd love for you to hop on over, grab a button and link up your Google +. If you don't have Google + it's ok, come link up your blog or favorite post.
http://mydailyphotojourney.blogspot.com/2013/01/google-social-hop.html
I'm also looking for Pinterest Pinners to feature every week beginning in January. If you are on Pinterest and are interested in being featured come link up! Who knows you might meet some other great pinners and gain a few great ideas.
http://mydailyphotojourney.blogspot.com/2012/12/looking-for-pinners.html
Hi Pam! I love those blue fabric baskets! x Teje
ReplyDeleteHi! Visiting from Better Off Thread linky party. Love your baskets and fabric choices..
ReplyDeleteOh what a fun variation! I need to make some fabric boxes to organize my stuff, but I don't know if I'll ever get to them!
ReplyDeleteThanks for linking up!
Lovely job ! They look great! Must give them a go !
ReplyDeleteVery good adaption!!
ReplyDeleteThese a great and I love your adaptations! I need to put this on my to-do list. Thanks for linking up with Sew Cute Tuesday!
ReplyDeletePam, I love all the basket variations! Whenever I see a different one, I want to get my small pieces of leftover fabric toghether and make a couple....more hours in the day, that's what I really need! Thanks again.
ReplyDeleteDonna @onceuponasewingmachine.com
Nice project!
ReplyDeleteI love your new blue baskets Pam! It's such a great tutorial and as you say - very versatile depending on what fabrics you choose to use!
ReplyDeleteThanks for linking to a Round Tuit!
Hope you’re having a fabulous weekend.
Jill @ Creating my way to Success
http://www.jembellish.blogspot.com/
I love your new baskets,with their colours,...but I love your all baskets:))!!!
ReplyDeleteHi, great post. I found you through the blog hop. Please stop by and say hi when you get a chance. .Be sure and check out my new Blog Hop that started. It's Weekly Goals Link Up. It's a great way to stay on track. Have a great day. :) Now following you. Here's the link for it if you would like to check it out.
ReplyDeletehttp://lenettacarnes.blogspot.com/2013/01/weekly-goals-linkup.html
Lenetta
Hi Pam, stumbled across you whilst looking for seagull inspiration, my friend just bought ' Seagull Cottage'. How refreshing to see gorgeous usable things instead of twee dust collectors.Love your things, so uplifting. May I pass on a tip re your quilt. I too used to stitch 'watching' TV...yawn... and made a huge one. Since then I have made them in 4 sections which can be invisibly joined with velcro.This way they are easy to wash, or spot clean just that quarter. They get SO heavy and you can halve them too for a snuggle on the chair.Love to Oz x Yve
ReplyDeleteThank you so much for your kind words, Yvonne. Great idea re making the quilt in sections. It would definitely make washing easier. Thanks for the tip!
DeleteHi I am hoping to make two baskets for my nephew's for their bedrooms.
ReplyDeleteI'd love to see pics.
Delete