


I'm taking part in UCreate's September Create With Me Project. This month, the project is a the Tohoku Tote bag, by I Am Momma Hear Me Roar.
Cheri gives detailed, easy to follow instructions for the Tohoku Tote. The front panel is pleated first and then cut out. This seems back to front to most patterns, but it works. Mind you, I cut out a rough rectangle first as I was finding the large piece of material quite bulky. I misjudged slightly and my bag ended up about half an inch shorter than intended.
I used a very light fusible interfacing on both the outside and the lining. It gives structure to the finished bag, without being too stiff.
This was my first time using boxed corners. It took me a couple of goes to understand how to do it. Once I understood the concept, it was very easy to do.
 |
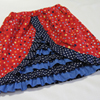
| Internal zippered pocket... |
 |
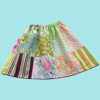
| Internal pockets... |
I added two large internal pockets, as described in Cheri's pattern. I also added an internal zippered pocket in the middle of the bag. I still have lots to learn about adding zippered pockets. Adding the zip was no problem. Getting the pocket the right size was not so easy. I made mine the width of the bag, but didn't take the gusset (formed by the box pleat), into consideration. Hence, my pocket is a little large. It doesn't matter, as it's on the inside and just makes the pocket larger, but it doesn't sit as well as I'd like.
Next step was the magnetic snap. This was the first time I'd used these snaps. It was so easy.

Much as I like the bow on the original pattern, I omitted it from my bag. I wanted the focus to be on the fabric I had chosen for the bag and I thought the bow would take attention away from the fabric.

All in all, I'm very happy with my new creation; one more thing I can cross of my To Do list...

Great bag and I love crossing stuff off my to do list.
ReplyDeleteI love the bag!I'll have a look at the tutorial, maybe I'll make one.
ReplyDeleteThis turned out so nice! I am planning on doing this too, so it was fun to see your bag!
ReplyDeleteGreat job - and pockets in bags can never be big enough so I think that your design here is spot on! Would make a handy baby change bag too with all the inside pockets.
ReplyDeleteGreat looking bag.
ReplyDeleteThis turned out so great! So glad you linked up to Show & Share! I have a giveaway going on right now would love to have you join in that also! http://mylilpinkpocket.blogspot.com/2011/09/mixed-bag-designs-giveaway-with-3.html
ReplyDeleteMarie
mylilpinkpocket.blogspot.com
I too have a plan to make it, but not started yet. your's is very beautiful. Thanks for your lovely comments...visit again...
ReplyDeleteVery nice! I made one, too! You can see it on my blog. Great job!
ReplyDeleteBeautiful fabric. A very nice job.
ReplyDeleteIt still amazes me to be able to see other peoples craft projects from a half a world away. Pretty Cool. Hello from North Carolina
Such a nice bag! Love the pockets :)
ReplyDeleteThanks so much for linking up to DIY Diva Thursdays :)
I just made mine today! Finished it about 30 mins ago! Love yours, great fabric choice. Hopefully I will be posting about mine in the next few days. Great to see another Aussie blogging and sewing!
ReplyDeleteLovely bag!!
ReplyDeleteLooks great and I love all your pockets inside!
ReplyDeleteIt came out great!! Love it!! I am visiting from Mine for the Making and I am a new follower!!! Hope to see you around my Delicately Constructed linky party this weekend!
ReplyDeleteHave a great day!
Michelle
www.delicateconstruction.blogspot.com
Awesome bag, looks great.
ReplyDeleteLooks Fab! I'm curious as to how you did the zippered pocket (and how the gusset affected it).
ReplyDeleteHope you are having a marvellous weekend! :)
To make the zippered pocket, I:
ReplyDelete- cut two pieces of fabric the width of the bag, but a few inches shorter.
- sewed the zipper onto the two pieces
- folded the fabric, wrong sides together, so the zipper was at the top
- sandwiched this between the two pieces of lining
- sewed the lining together, with the zippered pocket between the two pieces of lining
If the bag hadn't had boxed corners, (thus forming a gusset), this would have worked fine.
At the bottom of the bag, the zippered pocket is sewn in with the box corner, so the pocket curves. This bit is fine as it just makes the pocket bigger.
The problem lies at the top of the pocket where the zipper is. Because the gusset makes the width of the bag narrower than had it not had a gusset, the way I did it, the pocket is wider than the finished bag, so it doesn't sit as well as if it had been narrower.
I should have made the pocket pieces narrower at the top. I'm not sure about the bottom. I'll have to make another to test.
Hope this makes sense...
I did take the bag out for its first run yesterday. I'm very happy with how it performed:
ReplyDelete- good size
- handles the right length
- enough pockets for all my bits and pieces
Whatever the shape of the zippered pocket, it is very functional, as it accommodated my wallet, purse and keys easily.
Your bag turned out great! I love the fabric that you used, and it's nice to know how it looks without the bow. I'm planning on making this bag too, although I haven't had a day off yet to tackle it. Thanks for sharing!
ReplyDeleteI like your bag! The colors are perfect for toting around this fall. I've always wanted to try boxed corners on a bag too! Thanks for linking up with Eat, Grow, Sew!
ReplyDeleteLove this bag! I need to sharpen up my sewing skills so that I can make something cute like this! Thanks for linking up to the Creative Genius Link Party! I'd love to see you link up again tomorrow!
ReplyDeleteThanks again for linking up with Eat, Grow, Sew..I featured you today on my site, come on over and grab a button :)
ReplyDeleteYour's was one of my favorites! I love it!
ReplyDeleteLove your bag and thanks for sharing where you found the pattern. I've had the perfect fabric for a while, now I've got the perfect pattern too!
ReplyDelete