


In my first month of blogging, just over five years ago, I made a robot wall hanging. I do so wish I'd taken photos of the process, as I was, and still am, very happy with how it turned out. It would have made a great tutorial.

Over the last five years, the wall hanging has been in continual use.
Somehow or another, Little Mister ripped a couple of the pockets, by putting his feet in the them. Ha!... I caught him in the act.

I reinforced everything when I made the wall hanging, but it was not strong enough to take the weight of a child.

It was easy enough to fix. I unpicked one side, sewed up the ripped pockets, then stitched up the side.

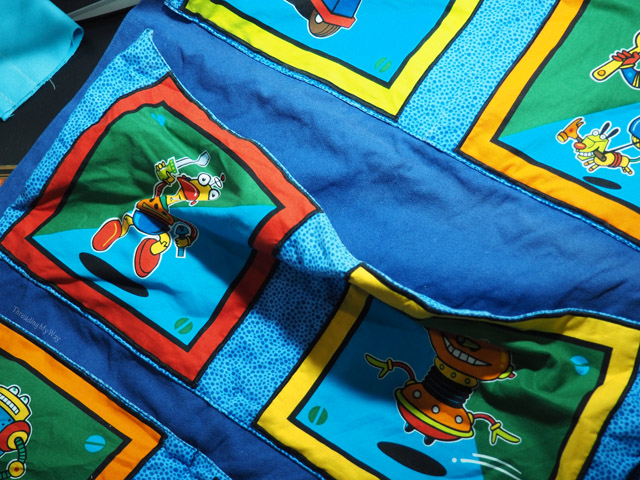
I've taken a few close ups, so you can see how the wall hanging was made. Before making the pockets the robots were appliquéd using a satin stitch, attaching them to the fabric that would become the pockets. The pockets are lined with the same quilting cotton as the backing material, so no seams showing.
The sides of each set of pockets are folded, sewn flat at the bottom, but left open at the top. You can see some of the reinforcing stitching in the photo below.

The backing is made from cotton drill, quilting cotton and thick, woven interfacing. I had nowhere to hang it at my place, hence the coat hanger.

Unless Little Mister does something else unexpected, I think his robot wall hanging will last until he no longer thinks robots are cool. Hopefully that's not too soon!
I'm thinking of making another wall hanging. If I do, I'll make sure I take photos.
... Pam
| Tweet |
ROTFL if a seam is to come loose, a kid's foot insertion is a pretty good reason for it - and I bet he was having a lot of fun at the time, imagination in full gear - LOVE IT!
ReplyDeleteWhat a great wall hanging, you did a great job!
ReplyDeleteSo cute! Kids love pockets--so much fun to stash things in, even feet!
ReplyDeleteSounds like that little mister has great faith in your ability to produce a wallhanging that doubles up as a climbing wall Pam!
ReplyDeleteДля помірного клімату України універсальні покришки стають дедалі популярнішим вибором серед багатьох власників легкових авто. На сторінці https://goroshina.ua/catalog/vsesezonni представлений чудовий асортимент моделей, які забезпечують стабільне зчеплення як влітку, так і в перехідний період. Це дуже зручне рішення для тих, хто хоче зекономити на сезонному шиномонтажі без втрати безпеки.
ReplyDelete