


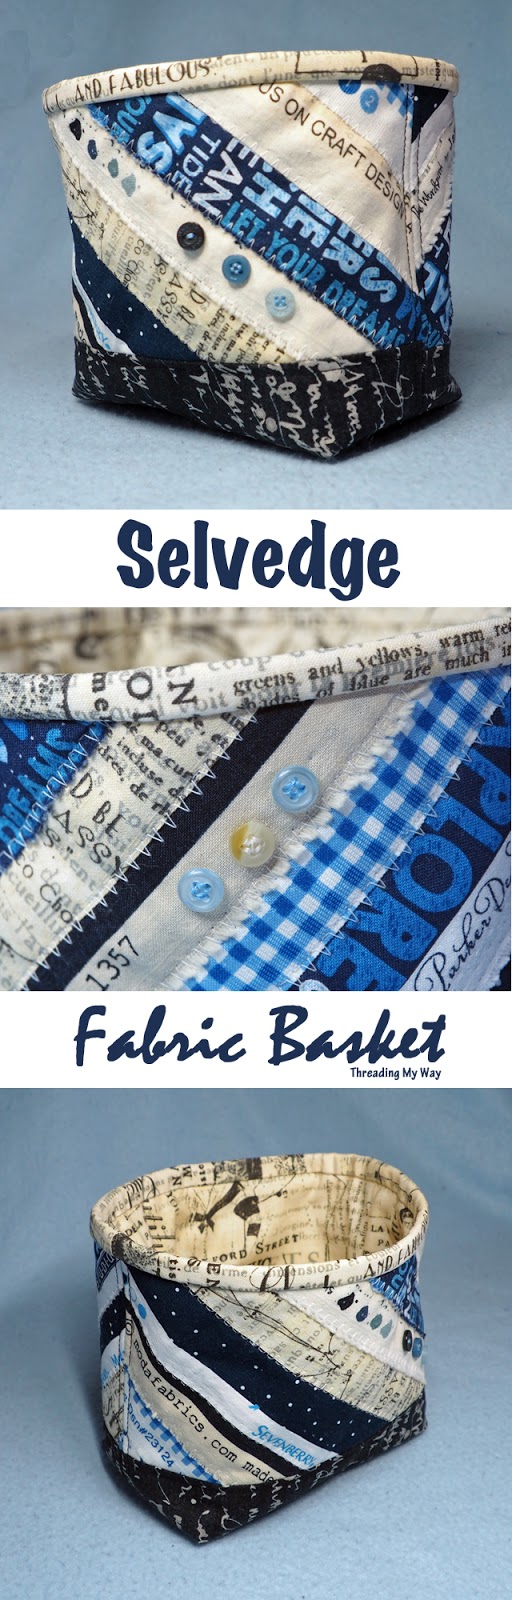
I am absolutely thrilled with my latest creation - a little fabric basket made with selvedges. With a finished size of 5" x 3" x 5" it's a handy size to hold bits and pieces in my sewing room - to help keep it tidy.

Last month, when talking about the return of my sewing motivation, I mentioned that an online friend had sent me a lovely email and a copy of one of her patterns. She knows I collect and like selvedges, and thought that her pattern might get me in the mood to use some of said selvedges.
Her email did more than that - it helped bring back my sewing mojo!!! I've been powering along since.

And so I present to you my little selvedge fabric basket, made using the Sewing with Selvedges pattern, by Daryl, from Patchouli Moon Studio.

This is one comprehensive pattern - 55 pages of colour photos and instructions - and shows
- four methods for sewing selvedges
- how to make a mug rug
- three methods for finishing a mug rug
- how to make a fabric basket
Once you follow Daryl's instructions for binding a mug rug, you'll know how to bind a quilt. Yes, the instructions are that detailed. Daryl uses the same method I use for binding quilts - no cutting corners because it's a little mug rug.

Unlike me, I followed Daryl's instructions - with one exception. I have a thing about using glue. When at quilting retreats and the tutor is standing watching, I do use glue as is often suggested. Otherwise, however, I do without. And, as Daryl wasn't looking over my shoulder, I didn't use the glue. I can see how the glue would hold everything in place, though.

I stuck to the one colour theme, and I do like the effect. My first selvedge project, a little drawstring bag (tutorial), used a black, white and red colour combo.
My selvedges are all random widths - whatever I felt like at the time the initial projects were cut out.
I use both selvedge sides - the one with all the markings and text, as well as the side where the print sometimes goes right to the edge of the fabric. And that has caused me to come unstuck with this basket. Did you notice that some of the text is upside down? Look closely at the first two photos.
Truth be told, I didn't even notice this until I was editing the photos!!! So, quite frankly, it doesn't bother me in the slightest. If it's something you would worry about, pay particular attention to the direction of text while laying out the selvedges.

I still have a very healthy selvedge stash!!! This little basket didn't even make a dent, but it's a start. I need a larger project next, or maybe several baskets in different colours, to organise my selvedge stash.
If you would like to make your own fabric basket (or mug rug)...
- Sewing with Selvedges (PDF pattern for mug rug and fabric basket)
- Patchouli Moon Studio on Makerist
Once again, thanks, Daryl, for sending your pattern my way.
For more selvedge / selvage inspiration...
Have you sewn with selvedges yet? I'd love to see what you've made if you have.
... Pam
| Tweet |
Oh Pam I love your basket!!!! The colors are beautiful and I really like that lining fabric. So glad to see you made the basket and that you found your sewing mojo again too, yay!!!! Hope to see more selvage projects made by you. A woman in my class that I taught made a beautiful table topper in a hexagon shape, sewing the selvages in wedges and putting it all together. That is a great one for using up a lot of selvages. Also tote bags use a lot. Happy sewing Pam!
ReplyDeleteYou lucky ladies with all the selvages! One day I'll have my own basket, but in the meantime, I'll just admire yours. ;-)
ReplyDeleteAnd no, I wouldn't mind if the writing were right side up or upside down. I would likely intentionally mix them up.
It's beautiful! I think it looks meant that the texts go in different way.
ReplyDeleteIt looks really useful and the button trim is perfect.
Hello mate nice bblog
ReplyDeleteSelvedge fabric baskets blend durability and craftsmanship, much like PGCE Assignment Writing Services combine expertise and care for future educators. Both are built to last whether holding treasures or supporting teaching journeys. Trust quality materials to elevate everyday tasks.
ReplyDeleteSearching for accounting assignment help? With expert assistance you can improve accuracy, save time, and clarify complex concepts.
ReplyDeleteChallenge your mind with solitaire, a timeless card game where success depends on smart planning, efficient moves, and the ability to adapt your strategy as new cards are revealed.
ReplyDelete