


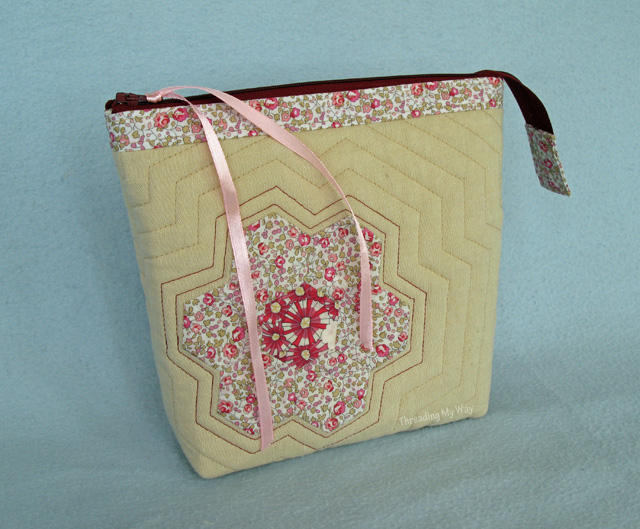
I'm loving my latest zippered pouch - Liberty, hexies, flowers, echo quilting - all wrapped up into one little bag. It's always good when the end result is just as you pictured it in your head. Sometimes the designs I imagine, don't translate into reality, but with this one, everything fell into place. I took a few pics along the way, so I'll show how you can make one, too.

Start with your hexagons. You'll need seven to make a flower:
- Make seven individual English Paper Pieced hexies, six in one fabric and the seventh in a different fabric.
- Sew your hexies together to form a flower.
- Press hexagon flower.
- Take out papers.
Cut one piece of neutral coloured fabric - 16" x 10" (41cm x 25cm) - the main body of the bag

Next step is to fuse the flower to the neutral coloured fabric, with double sided fusible webbing. You'll be doing this before the quilting. Obviously the photo above has been taken after the quilting. Follow manufacturer's directions to adhere the fusible webbing to the fabric. The following is a rough guide.
- Trace around the flower onto double sided fusible webbing.
- Cut a couple of mm inside the shape you have drawn, so the webbing is smaller than the fabric.
- Place the flower on the rough side of the fusible webbing.
- Place an old cloth under the fusible webbing and on top of the fabric before you iron, so glue doesn't get onto the iron or the ironing board.
- Press the iron rather than sliding it, to attach the fusible webbing to the fabric.
- Peel off the paper. There will be a thin film of glue left on the wrong side of the fabric.

- Place the wrong side of the flower appliqué onto the neutral fabric - 2" (5cm) from what will be the top of the bag (short edge) and a little under 2" (5cm) from what will be the side of the bag (long edge).
- Cover the flower with an old cloth.
- Press until the flower is glued to the fabric.
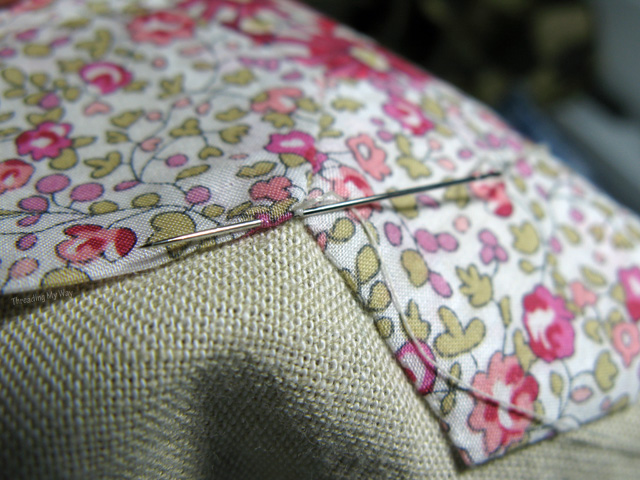
Using a slip stitch, hand sew the flower to the fabric. There are many ways to hand sew appliqués. I like to use a slip stitch as the stitches hardly show at all.
- Securely knot the end of the thread.
- Starting on the wrong side, bring the needle up to the right side of the neutral coloured fabric, level with the edge of the flower.
- Slide the needle through a small section of the hem on the flower and pull the thread through.
- Pick up one thread of the neutral coloured fabric and slide the needle through a small section of the hem on the flower and repeat the process.
- Knot securely to finish off.


A close up photo to show you just how little your stitching will show.

- Press your finished flower appliqué.

Make a quilt sandwich. Cut backing fabric and batting just slightly larger than main fabric. Layer the following...
- Backing fabric wrong side up. I use calico, but you can use anything, as it won't show.
- Batting
- Main fabric (neutral colour with hexagon flower), right side up.

Quilt fabric in any design you desire. You could quilt over the flower, but I chose not to. Leaving the flower un-quilted makes it stand out. Echo quilting around the appliqué further accentuates it. I just eyeballed the quilting lines. To begin with:
- Quilt once around the flower appliqué in a contrasting colour.
- Finish the first row at the same spot as the start.
- Quilt a second line about ¼" outside the first.
Starting and stopping for each row requires trying to hide those thread tails and securing them. I pretty much use the method in the first link below. For our zippered bag, it really doesn't matter if knots show at the back, as they'll be hidden by lining, but the following show how to do it so there's no knots at the back:
- How to Start, Stop and Tie-off When Machine Quilting
- How to Bury Knots When Machine Quilting
- Machine Quilting... Starts and Stops
- Starting and Stopping a Line of Quilting
Change to a neutral coloured thread and continue echo quilting, but in a sort of a spiral. When you approach the start of each row of quilting, veer to the un-sewn side, sew past, and begin a new row. You only have to do one start, and the finish will end up on the outside where the seam line will be.
The further each row is from the centre, the less it may resemble the hexagon flower shape. If you're really good, you'll keep the shape all the way to the edges. Again, just eyeball it. A pleasing overall effect is what you're after, not necessarily precise sewing. If you study my quilting lines, you'll see where I have deviated from the flower shape and, in my opinion, this in no way detracts from the appearance. In reality, no one is going to study your quilting lines!!!
For best results, use a walking foot, increase the stitch length and reduce the presser foot pressure.

- Square off corners and trim edges.
- Reduce stitch length. I set mine to 1.8.
- Sew a row of stitching around all edges, still with walking foot attached. I like to do this to prevent the cut quilting stitches from coming undone.

Attach contrasting fabric at both ends of quilted fabric. These two strips will end up at the top of the bag next to the zipper.
- Cut two pieces of fabric 10" x 2½" (25cm x 6cm)
- Interface with light weight interfacing. If using a regular weight quilting cotton, it's not necessary to interface.
- Fold in half and attach to either end of the quilted fabric.
Detailed instructions for this step --> How to make QAYG Fabric for a Zippered Pouch

Now it's time to take your fabric and turn it into a zippered bag.
Cut lining fabric the same size as quilted fabric with contrasting ends attached.
Attach zipper - I sew mine as in the Open Wide Zippered Pouch Tutorial
Box the corners - 2" (1" + 1" from the side seams) as per the Drawstring Bag Tutorial

- If the pattern calls for a seam at the bottom, omit this step.
- If the pattern leaves the gap in the lining at the bottom, leave your gap in the side seam.
Finish off your new bag with a zipper tab at the end of the zip, and a ribbon tied to the zipper pull. The finished size is 8¼" x 7½" x 2" (21cm x 19cm x 5cm).

I'm thrilled with my latest zippered bag! I really should stop calling it mine, though. I've given it to a friend, as a way of thanking her for giving my daughter and I a huge tub of gorgeous quilting fabric when she was de-stashing. She even gave me some coveted Liberty fabric, and just a little is returning to her, as the appliqué on her new bag.
I've made so many projects with the fabric I was given. There's so much, it really is fabric that keeps on keeping on. My two favourite projects have been:
Expect to see another Liberty Hexagon Flower Zippered Pouch in the not too distant future. The next one will be for ME!!!
... Pam
Tweet
If you think others would benefit from reading this post, feel free to share on social media.
Yes! You definitely need to make one for yourself!! Great job!
ReplyDeletePam This little bag is just so cute! Such pretty detailed work. I bet your friend was thrilled with it! :)
ReplyDeleteThat is beautiful Pam!! What a gorgeous little bag.
ReplyDeleteNice! I am jealous of your invisible hand stitching and the patience to do the intricate machine quilting which looks so artistic on the back, too.
ReplyDeleteThat bag is beautiful! I'm sure the recipient wasn't expecting anything in return, and certainly, as a crafter, will appreciate it as much as you and Tash appreciate the fabrics you were gifted :) I want to rub the Liberty fabric. Just a little! :D
ReplyDeleteGina and Sandra: I was indeed so thrilled to receive this gorgeous bag - it was a complete surprise.
ReplyDeletejennifer
Wonderful!!! and i am especially in like with the fact that you did not put the flower in the Middle!!! it is so refresshing and unique, Thank you mirjam
ReplyDeleteHi Pam,
ReplyDeletethe bag looks beautiful! I also have a lot of Hexagon flowers ... maybe for a beautiful bag as your;-)
Greetings from Germany,
Klaudia
Cute, pretty and beautiful pouch. Bookmarked this page to make one.
ReplyDeleteThat's a lovely work of art, Pam. Your quilting is inspiring me to add some to my next project... maybe.
ReplyDeleteThis is so pretty!! Perfect thank you gift too!
ReplyDeleteThat really is beautiful, what a lovely thank you gift too. Glad you're making yourself one.
ReplyDeleteJag kände igen mig i känslan du beskriver, när ett projekt verkligen blir precis som man föreställt sig, för ofta när jag sitter med egna små handarbetsidéer hamnar jag i samma loop av sprättande och omplanering. En av de där gångerna behövde jag bara rensa huvudet en stund och råkade klicka in på https://chicken-road.com.se mitt emellan två misslyckade sömmar, och som spelare i Sverige märkte jag snabbt att bonusarna gav lite extra utrymme att testa utan press. Jag fastnade för Starburst eftersom tempot var lagom avslappnat och ändå gav små kickar, och just den där korta pausen gjorde att jag kom tillbaka till mitt eget projekt med ny energi. Det har nästan blivit en liten ritual när kreativiteten börjar kärva, att byta spår en stund och sedan återvända med fräscha ögon.
ReplyDelete