


Another two zippered pouches finished, but not for presents. I'm keeping these ones!!! I love the shape, the colours and the free motion embroidery.


Almost a year ago, I attended a three day quilting retreat at Blackheath; the Autumn Triple Treat, with a different project to be tackled each day. The last day was spent learning free machine embroidery techniques with Petal Davies.

Our task was to construct a new piece of fabric with the kit we were given - strips of fabric fused onto Pellon. Petal made it look easy as she guided the machine to draw intricate shapes, designs and pictures.

Not nearly as easy as it first appeared!!! My first thought was a feeling of total freedom - just make the machine draw whatever I wanted. Not only does it take a GREAT deal of concentration, but the picture in my head didn't always translate to the end result on the fabric.
From the back view above, you can readily see the actual stitching. You can also see where the Pellon backing came away from the fabric and doubled over. By the time I noticed, there was NO way I was unpicking all those tiny stitches.

As with free motion quilting, we used the darning foot, with the feed dogs down. In my first post showing the beginnings of my free motion embroidery, I posed the question as to the difference between free motion quilting and free motion embroidery. My thanks to Wendy, from The Crafter's Apprentice...


I bought myself a pair of quilting gloves and found they really made a difference to guiding the fabric in the direction I wanted. They just help my hands stick to the fabric. I'd been told not to bother with quilting gloves - just buy a pair of gardening gloves or dishwashing gloves to cut down on the expense. Can't say I tried either. The quilting gloves are well worth the money to me:
- excellent grip
- light and comfortable
- breathe well and let the air in

I have to confess the zig zag in the photo above was sewn with the feed dogs up and my regular presser foot. To speed up the process, I cheated with some of the zig zag.

As you can see, I've used a lot of variegated thread of varying thicknesses and types. This meant experimenting with the tension. I tended to keep the tension down, between 1 and 2.

You can see more close up photos of the free motion embroidery in a progress post from last year. I've enjoyed the free motion machine embroidery journey so far, but I still have so much to learn. Here are a few resources which might help. Some of them use embroidery hoops, a technique which I haven't tried yet...
- Drawing with Your Sewing Machine: How to Free-Motion Embroider
- Introduction to Free Machine Embroidery
- Free Motion Embroidery
- DIY Scribbles
- Free-Hand Motion Machine Embroidery Session
- Free Motion Machine Embroidery
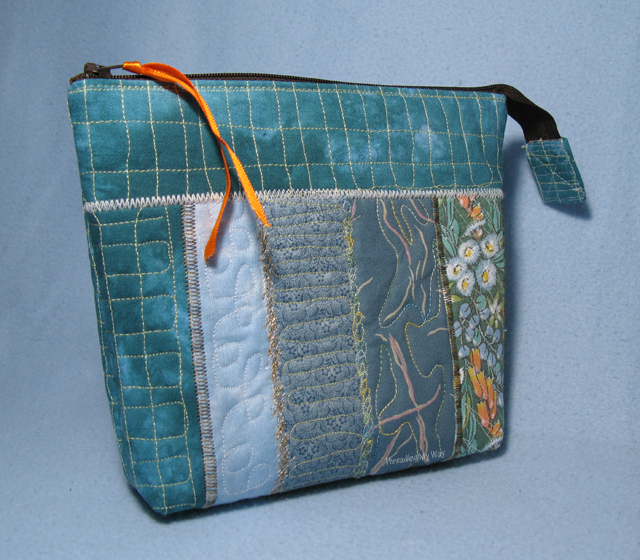
When I began this project, I didn't know what the end result would be. In our kit, there were instructions to make a clutch purse, complete with a lace motif. According to Sharon, my lace motif looked like a doily the dog had chewed and she was right... LOL!!! No way was I going to put dog eaten lace on my new free motion embroidered fabric!!!

Rather than go with one clutch purse, I decided to cut the fabric and make two zippered pouches using the open wide pouch tutorial, changing the dimensions to create narrower bags. The boxed corners of both ended up at 1½" wide. When making the bag you measure ¾" from each corner.

I really should have taken photos of cutting the fabric, but I was on a roll and didn't want to stop. Basically I let the fabric dictate where I made the cuts. I omitted the seam underneath the bag. The green at the top of the first bag came from one end of the original fabric and is attached by butting the ends and zig zagging. Yeah, another cheat with the regular presser foot. It achieved the look I was after, though.

The larger bag measures 6½" x 6½" x 1½"; the smaller, 6" x 5" x 1½". (width x height x depth)

The top of the second bag was made by using the fabric that was included in the kit and intended for binding. It's just doubled over and sewn with a normal seam, then topstitched. It's not very wide and reasonably thick, so no need for interfacing.

My new bags are my favourite open wide zippered pouches to date.
They'll be joining the 230+ bags in the Purses, Clutches & Pouches collection here at Threading My Way.
I'm looking forward to this year's Autumn Triple Treat next month. While many of you are looking forward to warmer weather, I'm hanging out for cool Autumn days next month. In Petal's workshop we'll be playing with Autumn themed three dimensional appliqué techniques. Perhaps there'll be more free motion machine embroidery.
Have you ever experimented with Free Motion Machine Embroidery? It's a lot of fun and most definitely brings out the creative side.
... Pam
Tweet
Fantastic Pam! Smaller projects are such a great way to try lots of FMQ designs before committing to a huge quilt! Gorgeous zippies!
ReplyDeleteOh Pam! Love what you have made. Ideally one day I would be able to do such wonderfully complicated projects of sewing and quilting ;) But for now I really am enjoying your tutorial and work. Reminds me there is so so much to learn. Thank you.
ReplyDelete-FarZain
@http://colorsofourrainbow.blogspot.ae/
These are great. This is the first time I have heard of quilting gloves too! Thanks for the tip.
ReplyDeleteI love those flowers! Got the gloves. Now I just need to find the nerve.
ReplyDeleteI love machine embroidery, and combining it with applique too, very freeing, and something I seem to use lots in all kinds of projects. And I'll definitely explore those links you included too, thank you, they sound really interesting. Your bags look great, I especially love the flower pattern you sewed, it did look completely like a new fabric.
ReplyDeleteThose are gorgeous!!! What fun. I have got to get one of those darning feet and try that. :)
ReplyDeleteA really lovely way to use up pretty scraps, Love the machine embroidery too. I'm going to have a go at this.x
ReplyDeleteA really lovely way to use up pretty scraps, Love the machine embroidery too. I'm going to have a go at this.x
ReplyDeleteGreat job! I am so impressed by what you accomplished! I have FMQ on my list of things to try this year, and I'm still nervous about jumping in! Lovely little finish!
ReplyDeleteHarrumph the commenting glitchfairies ate my first comment for a snack, lol. I mentioned that with the $$ we spend on fabrics, interfacing, batting, thread, notions etc. it's hardly worthwhile to skimp on quilting gloves - they're a fantastic help while quilting!
ReplyDeleteYour bags worked out well! The colours in the one with the orange z-pull remind me of the ocean - very pretty :)
Stealing this idea.
ReplyDeleteWow! That's really interesting!
ReplyDeleteLooks great!
Carol
Love the pouches. Indeed a great way to make something nice and practice new skills :)
ReplyDeleteThose are gorgeous! They'd be a great of using up scraps and they'd make good gifts for people too :)
ReplyDeleteThanks so much, Anna. They would make great gifts, but I'm keeping them for me. Think I'll have to make some more.
DeleteHi Pam, I just found your blog, it's super!! Those bags are beautiful, you are lady with great talent, and like we say- with golden hands. I'm glad to became your new follower. Regards.
ReplyDeleteBeautiful !!! Your pouches are gorgeous !! The free motion gives a new texture to the fabric.
ReplyDeleteI understand that you want to keep them for you, I would do the same.
Very nice job! Love them !!!!1
Love your new pouches, Pam. Looks like you did have a lot of fun practicing the fmq. My favourite is the flowers made from the polka dot fabric. One of these days.... I'll have to make a pouch or two. Now, thanks to you, I know where to look for ideas!
ReplyDeleteThis looks great! Your fmq has turned out really well and the pouches are beautiful :)
ReplyDelete