


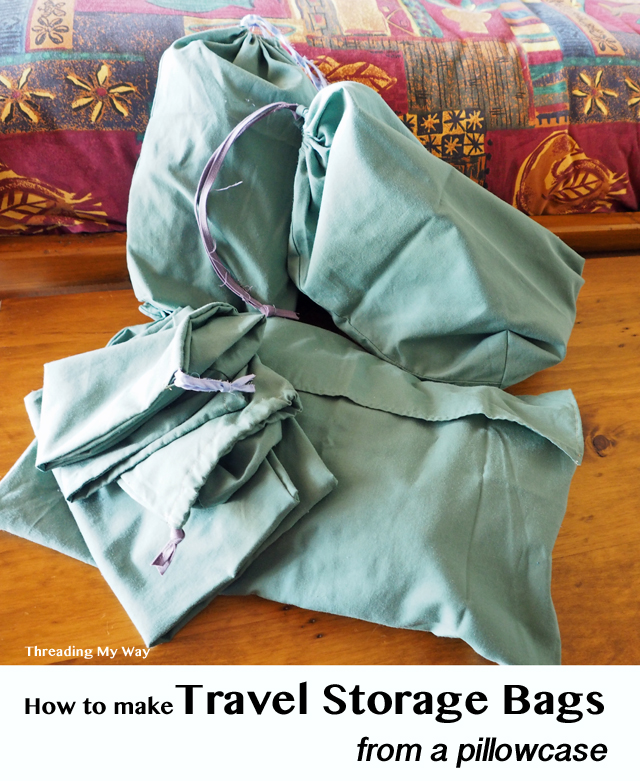
For my last holiday, I made myself some travel storage bags to help keep my belongings organised for the week. I wanted a low cost solution and came up with a set of six bags made from just two pillowcases - shoe bags, laundry bag, socks bag, lingerie bag and t-shirt bag. Today I'll show you how I made my travel storage bags for absolutely no cost whatsoever.
Pre-loved pillowcases are a great idea as the existing seams can be utilised, saving time. From each pillowcase I was able to make two drawstring bags and one envelope style bag.
Grab one or two old pillowcases and let's begin.
I'm only including rough measurements, as you will need to determine how big your bags need to end up. It all depends on what you'll use them for and in the case of shoe bags, the size of your shoes.
To begin with...
- Cut the pillowcase in two, across the width of the pillowcase and through both layers. I cut 15" from the bottom of the pillowcase.
- Divide the bottom piece in two and cut. I made my two halves the same, but you don't have to.
This gave me two bags 15" x 9" and one 13" x 18" before sewing. With the second pillowcase I varied the widths of the bags. The smaller bags were made into drawstring bags and the larger ones into envelope style bags. These measurements are for standard Australian pillowcases.
Drawstring Bags
The bottom seam and one side seam is already sewn.

- Measure 1½" from the top of the un-sewn side.
- Sew the side seam, beginning at the 1½" mark.
- Neaten the edges separately.
In the photo above you can see how I neatened the edges separately for about 2", then (after the photo was taken) I zig zagged the rest of the seam in one go.


- Stitch the side seam down - just the top part which is not sewn.

- Turn the top edge of the bag down ¼" and either stitch or press.
- Turn under ¾" and stitch.

Casing ready for the drawstring - shown on the inside of the bag...

... and the outside of the bag.

- Thread the drawstring into the casing.
For these bags I used parts of clothing that I had previously deconstructed.

Box the bottom corners of the bag...
- Measure and mark 2" from each of the bottom corners. Vary this measurement depending on how wide you want the bag to be.

- Place one mark on top of the other.
- Draw a line across the corner.
- Sew along the line.
Imagine there is a seam along the bottom of the bag. Line up the bottom seam and the side seam so the two seams and marks are on top of each other. It doesn't have to be exact in this case.
For a detailed description of this step, scroll down to Make the box corner, in my drawstring gift bag tutorial.

- Cut off the excess and neaten.

My Sketchers fit comfortably inside. Despite the length of the tutorial, these drawstring travel bags really are very easy to make.
Envelope Style Bag
I didn't take any photos of this one, but it is SUPER quick.
To make an envelope style bag, take the larger top section of the pillowcase that you previously cut. This is the part that has an envelope enclosure on the pillowcase.

- Cut the sides of the envelope flap - on the inside of the pillowcase.
- Neaten the edges by making a small hem - turn under twice ⅛" + ⅛"
The flap then goes to the outside of the bag.
I used one of these to hold my Winter pyjamas and the other contained rolled up t-shirts.
I used one of these to hold my Winter pyjamas and the other contained rolled up t-shirts.

Seriously, this tutorial took WAY longer to write than making all six bags.
For no cost at all, and next to no time, I now have a set of bags which helped keep me organised during my holiday. No more rummaging through a suitcase trying to find clothing. And one of the bags served as a place to hold laundry for washing when I arrived home.
This is definitely a functional, rather than a pretty project. I suppose I could embroider names or pictures on the outside, but the reality is, the purposes the bags serve will vary with each trip.
How do you maximise space in your luggage when you travel? What tips can you share as to how you stay organised?
For a fancier travel bag, check out my travel shoe bag, made for one of my sons.
... Pam
This is such a great idea! I've got a Craft Gossip post scheduled for tomorrow evening that features your tutorial:
ReplyDeletehttp://sewing.craftgossip.com/?p=88477
--Anne
Great tutorial. These are super for the upcycling and low/no cost factors, as travelling tends to be expensive enough, in and of itself. My other half and I both carry shoes in similar fabric bags, although I did not make them. However, to answer your question, the best tip I have about maximizing space is to pack using extra large zip lock bags. (Larger ones than normal kitchen freezer style bags - about 33 cm x 40 cm; I get mine at the discount store.) The air can be squeezed out of them, you can easily see what's inside, they do a better job of keeping clean and "not clean" clothes apart, and they keep bugs out! Of course, if you want to spend a bundle, you can buy those vinyl packing cubes that accomplish the same thing, but I can get these bags for less than 25 cents each.
ReplyDeleteThat's a good idea, and with pretty pillowcases (or fabric, even), would make a great gift for a traveller!
ReplyDeleteLove your idea! I've heard of adding a pull string to the pillowcases that are donated to Child Care so Children can caring their belongings with them.
ReplyDeleteI decided a long time ago to not cut off my corners for two reasons. In some cases like gift bags and purses, the extra fabric just adds some body and reinforcement to the bottom of the bag and 2. Don't have to worry about raveling in the wash.
Great tutorial too.
Great idea, I wish I was better with a sewing machine!
ReplyDeleteThanks for linking up at the DIY Crush Link party. I've featured your tutorial this week on Easy Sewing for Beginners as it's such a great cost effective and organised idea for when someone's travelling!
ReplyDeleteThis is such a good idea, especially for laundry, I always find myself hunting around for a spare bag to put the dirty washing in if we're away for a weekend. Next time I'll be more organised now hopefully.
ReplyDeleteThis comment has been removed by the author.
ReplyDeleteTravel has always been a deeply enriching experience, offering people the chance to escape the routine of daily life and immerse themselves in new worlds. It is a bridge to understanding, breaking down barriers between cultures and allowing us to see life through a different lens. Every destination has its own story, its own rhythm, and its own charm. When we step outside our comfort zones and into unfamiliar territories, we awaken a curiosity that transforms the way we perceive the world and ourselves.Mexico City Airport Sleeping Pods
ReplyDeletehi
ReplyDeleteSuch a clever way to repurpose pillowcases into travel storage bags—both eco-friendly and functional! Just like these DIY solutions keep things organized on the go, businesses can rely on Kingchuan Packaging for top-quality materials. As leading China High Barrier Film Suppliers, they offer durable packaging solutions that ensure product safety and efficiency. Definitely worth checking out if you're looking for reliable packaging options
ReplyDeleteBangalore, often called the Silicon Valley of India, is not just a hub for technology but also a thriving center for travel enthusiasts. With a growing number of residents looking to explore both domestic and international destinations, the demand for a reliable travel agency in Bangalore has never been higher. From personalized itineraries to visa assistance and flight bookings, agencies today cater to every need of modern travelers. For those who want to go beyond India’s borders, choosing an international travel agency in bangalore ensures seamless planning and unforgettable experiences, whether it’s a family holiday in Europe or a business trip to Singapore.
ReplyDeleteBangalore’s festivals, food scene, and nightlife are additional attractions that travelers often want to explore. Travel agencies help by suggesting itineraries that coincide with local events, popular food trails, and entertainment hotspots. Their insider knowledge ensures visitors experience the city like a local, maximizing enjoyment in a limited time. This curated approach is a hallmark of top travel agencies in Bangalore.
ReplyDelete