


The other day I showed you the quilt my daughter and I made together. We are both very pleased with how it turned out, and it seems, you guys like it too. I've had a few people ask me how we put it together, so I'm going to give you a few more details to enable you to make one, too.
When I do a full tutorial, I write notes as I go, take a lot of photos and record accurate measurements. Having done none of these, this is not a detailed tutorial. However, I should be able to give you enough of an overview for you to follow.
Here we go...
Easy option - grab a charm pack that contains 42 pre-cut 5" x 5" squares, preferably with pinked edges. You can, of course, use pinking shears to zig zag the edges, but the pre-cut ones might have a finer zig zag.
Or, cut your own squares and bust some of your scraps.
Zig Zag Edges
If your squares don't have pinked edges, use pinking shears to zig zag the edges of each square, before you start sewing.
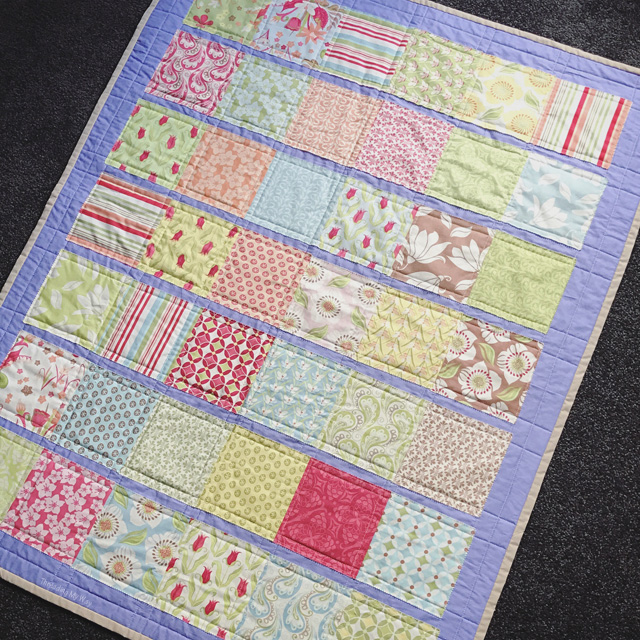
Arrange Squares in Strips
Play with the squares to form a pleasing design. creating seven rows, each with six squares.
Sew Strips / Rows
Using a ¼" seam, sew the squares together to form strips - six squares to each strip, or row. Backstitch to start and finish each seam.
Pressing Strips
Press seams to the side.
Cut Fabric for Quilt Top
Cut fabric for the quilt top - roughly 37" x 46". Remember, my measurements are only estimates. I've tried to err on the side of caution, but to be safe, place your finished rows on your own fabric and take your own measurements.
Sew Strips onto Quilt Top
Place strips onto quilt top, roughly ½" apart. Again, use a spacing that works for you.
Sew close to the edges of each row.
That's it. Your quilt top is finished!!!
Time to use your favourite methods for finishing off and turning your quilt top into a quilt. The following resources may be of help.
- Intro to Quilting
- Square a Quilt Top
- make a quilt sandwich
- 12 Tips for Basting a Quilt
- Tips & Techniques for Straight Line Quilting
- Machine Binding
I did simple straight line quilting. It's a little hard to see the difference between the quilting lines and the stitching that holds the rows in place. Both look like quilting lines on the finished quilt.
Over time the pinked edges will fray a little, adding to the charm of the quilt.
I wouldn't make a quilt that frays like this for a baby, toddler or young child, though. Fingers, toes, or even hands and feet could get caught in the loops of thread that will form over time with the fraying.
To prevent the edges from fraying, sew a zig zag stitch along the raw edges just after attaching the strips to the quilt top.
The appliquéd strip quilt would have to be the easiest quilt I've ever made!!! It's definitely not a conventional way to make a quilt, but it works.
Do you think it's important to always follow sewing conventions?
At what stage during the quilt making journey do you wash? Does this change if sewing with pre-cut fabrics?
Thanks to Little Ladybird for the photo.
... Pam
| Tweet |
I would have never thought of making it that way!
ReplyDeleteI would never have thought of that either - what a cute way to get a quick finish!
ReplyDeleteI stand firmly in the *wash before using* group. I don't sew with unwashed and un-preshrunk fabric ... which could be why I have a bit of a stash of pre-cuts downstairs - I really haven't worked out in my mind, how to deal with them, lol!
Ok, I understand it much better now. I thought the periwinkle was in strips, but it's one large piece of fabric with the strips of pieced squares on top. Thankyou.
ReplyDeleteGlad it makes sense now, Kathy.
DeleteI read somewhere that you shouldn't wash pre-cuts so I don't! I do tend to wash anything that I buy over 0.5 yd and try to wash anything red as I have seen so many people come unstuck with red dye running in the first wash.
ReplyDeleteI get it now!!! Thank you, Pam! Your shared quilt is so clever. :)
ReplyDeleteOh boy, a new technique to try!!
I always wash yardage before it comes into my sewing room, but I don't wash precuts!
Thanks so much, Sheila. Leaving the strips as is, was my daughter's idea. I'll pas on your comment.
DeleteWhat a great idea for a light weight Summer quilt. I would add one more layer of fabric (backing) for stability when washing. I'd spray baste the two layers, then spray baste or pin the strips onto the front (sashing) fabric, then start sewing and quilting. Definitely something I will try. Thanks for the idea!
ReplyDeleteCute idea. Thank you.
ReplyDeleteThanks for taking the time to leave a comment.
DeleteElevate your unique style with Adoro's extraordinary handbags collection. Each piece is a testament to avant-garde design and impeccable craftsmanship. Redefine fashion; carry a statement with Adoro.
ReplyDeleteVisit Mohagni to browse the newest selection of womens formal dresses.Find the ideal outfit to turn heads at any special event.Online shopping in Pakistan for women clothes.
ReplyDeleteOne well-known clothing brand that sells stylish yet cozy styles is FABCART.Pk . Anyone who wants to look fashionable and feel comfortable all day should choose one of their selections.
ReplyDeleteWhat a fantastic resource! I'm bookmarking this for future reference. Your detailed explanations are invaluable. Thank you for putting in the effort. Jacket Artisan
ReplyDeleteYour post has given me a new perspective on [topic]. I appreciate the thoughtful analysis you provided. Your insights are truly enlightening. The Perfect Jackets
ReplyDelete