


Today's post is all about seams - a guide to show you the different types of seams and how to sew them:
- plain seams
- welt seams
- French seams
- flat felled seams


Right side
- With right sides of fabric facing, sew a line of stitching to secure.
- Sew 1/4" to 5/8" from the edge of the fabric.
There are several ways to finish plain seams. How you finish a plain seam, is largely a matter of choice.

Only use pinking shears to neaten seams if the fabric doesn't fray easily.

Overlocking the edges together is usually done on a narrower seam.

Overlocking (serging) each side of the seam reduces bulk. This is usually done on a wider seam.

Use a zig zag stitch if you don't have an overlocker (serger).

Same as with overlocking, this is usually done on a narrow seam.

Binding creates a very neat finish. I used binding on my Retro Flower Power Pillow.

Many moons ago, when we were sewing at school, our sewing machines didn't have a zig zag stitch, so neatening the edges by turning a hem was what we did. This is called a plain seam with a clean edge finish. It is still a good finish for very thin fabrics.

If the fabric will fray easily, a double hem can be turned.
We were taught to always use 5/8" for seams and patterns always used 5/8" seams. Now-a-days the rules have relaxed and seams can be found in any width from 1/4" to 5/8".
When I looked in my wardrobe, the majority of my blouses were sewn with a narrow plain seam, finished by overlocking both edges of the seam together, as in the picture above with green fabric. Industrial machines will sew the seam and overlock at the same time.
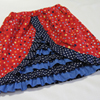
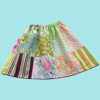
Welt seams are stronger than plain seams and are often found in garments with thicker fabrics. Some of my jeans have welt seams. There are two methods for making welt seams, although I feel the first, where the fabric is cut, is perhaps the traditional method. I used a welt seam (method 2) when making my pintucked skirt.

Right side of the jeans

Inside of the jeans
Method 1:
- With right sides of fabric facing, sew a line of stitching 5/8" from the edge of the fabric.
- Cut roughly half of the seam allowance off, on one side of the seam only
- Zig zag or overlock the uncut edge.
- Press the seam to one side, so the uncut edge covers the cut edge.
- Sew 1/4" from the seam stitching.


Right side
Method 2:
- With right sides of fabric facing, sew a line of stitching 3/8" to 5/8" from the edge of the fabric.
- Zig zag or overlock the two raw edges together.
- Press the seam to one side.
- Sew 1/4" from the seam stitching.

Inside

Right side
French Seams
French seams make the inside of garments as neat as the right side. They are sometimes used on clothing for babies and on thin fabric. I use them on bags that are not lined, such as my Treasure Bags and sometimes I use them on clothing, such as dresses or skirts. I could only find one article of clothing in my wardrobe that had french seams; a blouse made from a thin cotton fabric.


Right side
- With wrong sides together, sew 1/8" from the edge of the fabric.
- Trim any loose threads.
- Turn the material so that the right sides are together.
- Press.
- Sew 1/4" from the edge.


Flat Felled Seams
Flat felled seams are the strongest seams and won't fray as raw edges are hidden. Although often sewn on thick fabrics, they can be sewn on thinner fabrics as they produce a very neat finish. A lot of my jeans have flat felled seams, as does a pair of zumba pants. The shirt that I refashioned into a skirt, even though made from thin cotton fabric, originally had flat felled seams.

Inside

Right side
- With wrong sides of fabric facing, sew a line of stitching 5/8" from the edge of the fabric.
- Cut roughly half of the seam allowance off, on one side of the seam only
- Fold the uncut edge over the cut edge and press
- Press the seam towards the garment, with the cut edge down, so the raw edge is hidden.
- Sew as close to the edge as possible.


I originally wrote this post as part of the Back to Sewing Basics series, over at Sew Delicious.
I love this ! Thanks for sharing Pam!Looking forward to read more of these
ReplyDeleteGreat round up of all the different seams, Pam!
ReplyDeletewow, thanks for sharing, Pam! I never knew about plain seams with clean edge finish! great resource!
ReplyDeleteWhat a great round up of all those seams Pam!
ReplyDeleteThanks for linking to a Round Tuit!
Hope you have a fabulous week!
Jill @ Creating my way to Success
http://www.jembellish.blogspot.com/
Thank you for sharing this! I have to make a pair of jeans for the toddler with the flat felled seams. I use this method for shirts too! What it's funny, it's that in English, you call "French seam" what we call in French " Couture anglaise" which means "English seams"
ReplyDeleteI stopped by via the Creative Me linky and I pinned this post ;)
http://ellecrafts.blogspot.com
this is awesome! thank you!
ReplyDeleteOMG so much info, thank you so much this is amazing :)
ReplyDeleteReally interesting! I always wondered what a French seam was!
ReplyDeleteWhat a wonderful post and great info! I think over the years I have made all of those seams. Thanks for sharing.
ReplyDeleteFreemotion by the River Linky Party Tuesday
Just stopping by to invite you to My Wednesday Linky party. http://diycraftyprojects.com/2012/10/whatcha-work-up-wednesday-linky-party-6.html
ReplyDeleteThank you for this post! I rely on French seams, but I really should experiment with those other seams!
ReplyDeleteWow, there are so many techniques out there that I didn't really know existed! I'll have to attempt some in my future sewing projects!
ReplyDeleteA wonderful tutorial for any level of sewer. Thanks so much for putting this together. As an advance/professional quilter/seamstress, I can tell you that one can always learn something new from information like this Seam Finishing post. I'm visiting from Petals to Picots Friday Link Party. I hope you'll stop by CollectInTexas Gal and see My Sewing/Needlework Nests Post. So happy to find your blog...I'm a new follower.
ReplyDeleteWow, thank you SO much for these little tutorials! I've always wondered about the French seams, and now I know. :-) Thanks for sharing at The Fun In Functional!
ReplyDeleteJust stopping by to let you know I featured this on my blog today! Also, I put French seams in a bag I was sewing yesterday and they turned out great, so thanks for the instructions! You can check out the feature and grab a button here: The Fun In Functional #24
DeleteSuch helpful and clear! Thanks so much for this!
ReplyDeletePam, this is such a wonderful tutorial on seams! Thank you for sharing this, you answered a couple questions that I had! xoxo
ReplyDeleteVery excellent instructions. This will be bookmarked for sure! Thanks for sharing it :)
ReplyDeletegreat post! thanks so much for sharing on craft schooling Sunday!
ReplyDeleteAwesome post Pam!!!
ReplyDeleteyour back to basics link isn't working properly. It takes you there, but then it redirects and you can't get back to it
ReplyDeleteThanks for letting me know. All fixed now.
DeleteNicely done. One question...for the description for the flat fell seam you say to sew the seam with right sides facing, however the photos appear to show the wrong sides facing. ?
DeleteThanks so much for leaving me a comment! You are correct - my instructions and the photo didn't match. I've amended the text to match the photos.
DeleteFlat felled seams can be sewn so the seam sits on either the outside or the inside of the garment. For a seam that sits on the outside - sew wrong sides together for step 1, as in the photos above. For a seam that sits on the inside - sew right sides together for step 1.
Great article! I'm new to sewing and find this very helpful. I have one question about welt seams, method 2. In the instructions, it doesn't say anything about doing a zig-zag stitch. However in the picture, it looks like there is a zig-zag. How & when do you put that in? Do you zig-zag the two raw edges of the fabric together after the first straight seam and before the second one? Thanks!
ReplyDeleteWell spotted, Abigail. I've amended the directions.
Delete1.With right sides of fabric facing, sew a line of stitching 3/8" to 5/8" from the edge of the fabric.
2.Zig zag or overlock the two raw edges together.
3.Press the seam to one side.
4.Sew 1/4" from the seam stitching.